When you pull up ninja pressure cooker air fryer recipes, you're really looking for one thing: meals that come out crispy on the outside and tender on the inside without juggling three different appliances. The Ninja Foodi line does this by combining a pressure cooker and an air fryer in a single unit, using a method called TenderCrisp that pressure-cooks food first, then swaps lids to air-fry the surface. As of 2026, the Ninja Foodi remains one of the best-selling multi-cookers in the US, with aggregate user reviews consistently rating the 6.5-quart and 8-quart models above 4.5 stars across major retailers.
The trick is knowing which recipes actually take advantage of the dual-function design and which ones work just as well in a standard air fryer. Below are the recipes that genuinely shine in the Ninja Foodi, with real timing, temperatures, and the method that makes each one work.
Quick Answer
Ninja Foodi recipes use a pressure cooker and air fryer in one appliance. The TenderCrisp method pressure-cooks food first, then air-fries for a crispy finish. Top recipes include whole chicken, baby back ribs, hard-boiled eggs, wings, salmon, and pot roast.
Most meals take 20 to 35 minutes total. Always add at least one cup of liquid when pressure cooking.
What Makes the Ninja Foodi Different from Other Air Fryers
The core difference is the two-lid system. Most air fryers have one heating element and one basket. The Ninja Foodi has a pressure lid and a crisping lid, both hinged to the same base.
You pressure cook under the first lid, release pressure, then flip the second lid into place to air-fry.
This matters because it changes what you can cook. A standalone air fryer can crisp chicken wings. The Ninja Foodi can pressure-cook a 4-pound whole chicken in 25 minutes, then air-fry the skin golden in 10 more.
That two-step process is the TenderCrisp method, and it's the reason most people buy this appliance.
The unit runs at 1400 to 1550 watts depending on the model. The inner pot holds 6.5 or 8 quarts. The non-stick ceramic coating is PFOA-free.
Temperature range for air frying runs from 300°F to 450°F. Pressure cooking operates at approximately 15 PSI, which reaches roughly 239°F inside the sealed pot.
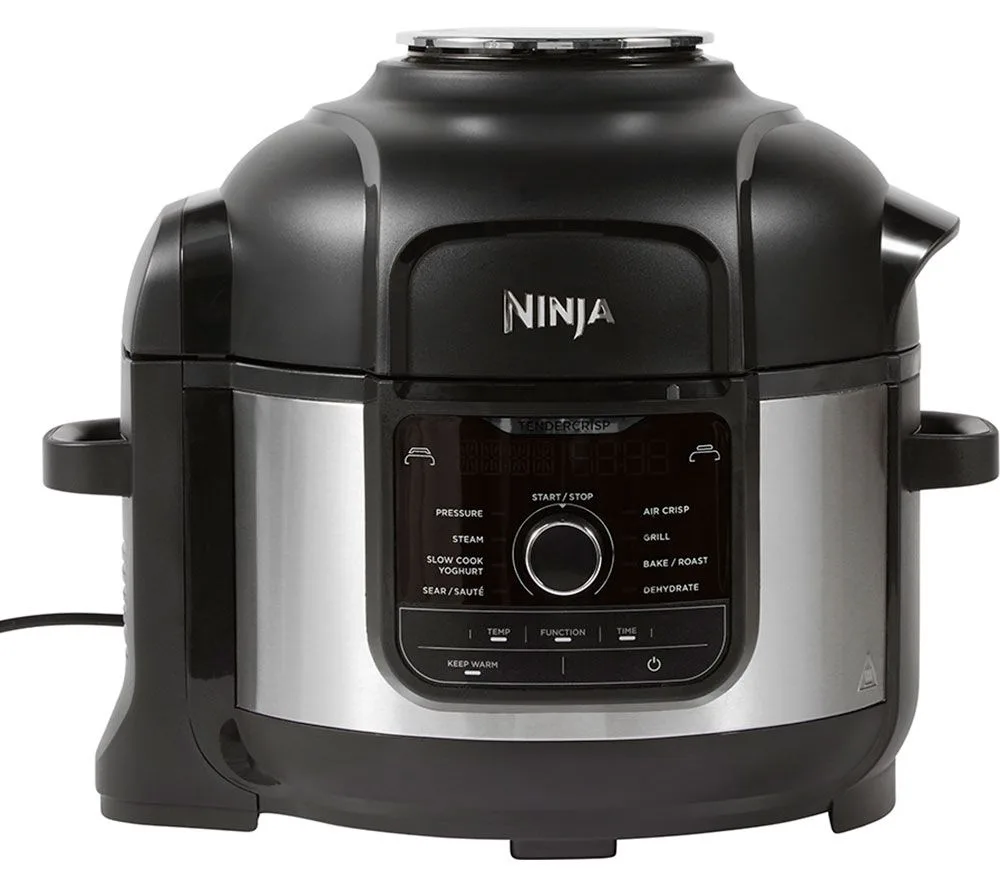
Image source: Bing (Web (fair-use with source credit))
If you're coming from a standard air fryer, the learning curve is mostly about lid management and liquid requirements. Every pressure cook cycle needs at least one cup of liquid to generate steam. Skip that and you'll hit the burn notice within minutes.
We've found that kid friendly air fryer recipes translate well to the Ninja Foodi once you understand this basic rule.
Best Ninja Foodi Recipes That Actually Work
Not every recipe benefits from the dual-function design. Simple air-fry-only foods like frozen fries or mozzarella sticks don't need the pressure cooker at all. The recipes below are the ones where the Ninja Foodi genuinely outperforms a standalone air fryer or oven.
Whole Chicken — The "Wow Factor" Recipe
A 4-pound whole chicken takes about 25 minutes under high pressure, followed by 10 minutes of air crisping at 450°F. The result is juicy meat with crackling skin. Pat the chicken dry before crisping.
Rub with olive oil, salt, pepper, and garlic powder. Place it breast-side up on the reversible rack in the lower position. Add one cup of water or broth to the pot.
After the pressure cycle, quick-release the pressure. Swap to the crisping lid. Air crisp at 450°F for 8 to 12 minutes until the skin is deep golden.
Let it rest 5 minutes before carving. Internal temperature should hit 165°F in the thickest part of the thigh, per USDA Food Safety and Inspection Service guidelines.
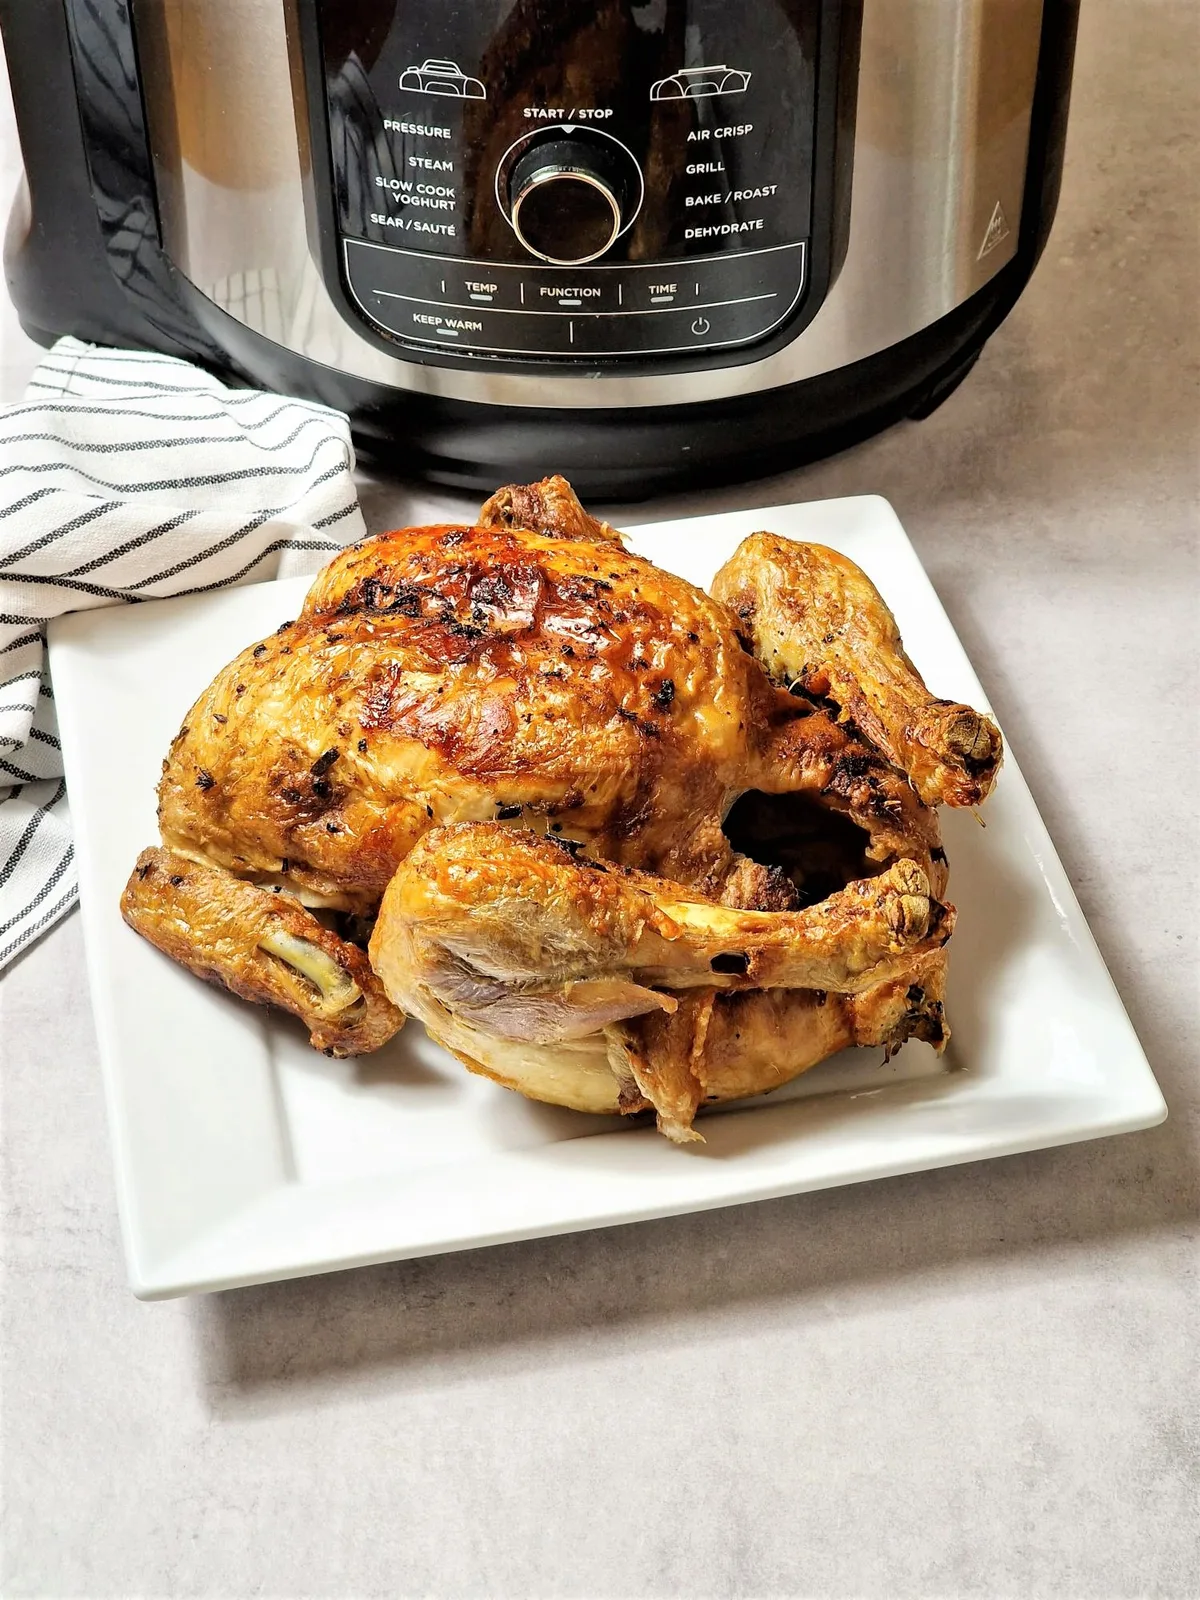
Image source: Bing (Web (Web (fair-use with source credit)))
Baby Back Ribs in Under 35 Minutes
This is the recipe that converts skeptics. A rack of baby back ribs takes 25 minutes under high pressure with one cup of liquid, then 8 to 10 minutes under the crisping lid with BBQ sauce brushed on. The meat pulls clean from the bone.
Cut the rack into sections that fit the pot. Season with a dry rub first. Pressure cook on high for 25 minutes with a quick release.
Brush with sauce. Air crisp at 400°F for 8 to 10 minutes.
If you want to explore more air-fryer-specific rib techniques, our guide to BBQ chicken recipes air fryer covers dry rub and sauce timing in detail.
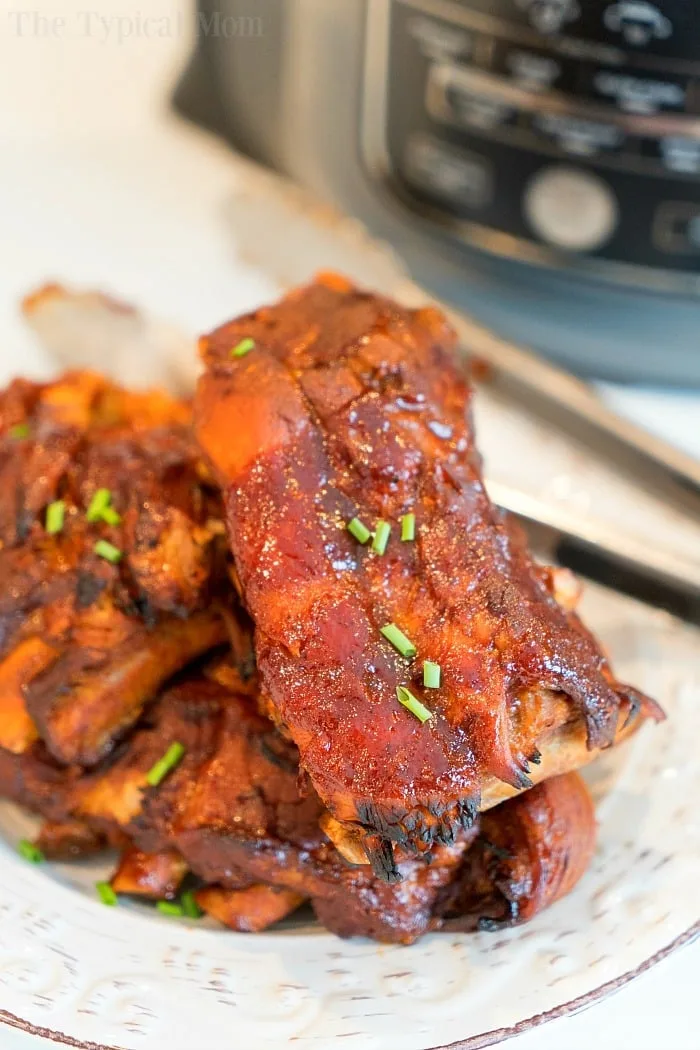
Image source: Bing (Web (fair-use with source credit))
Perfect Hard-Boiled Eggs Every Time
Place 6 eggs on the reversible rack with one cup of water in the pot. Pressure cook on high for 5 minutes. Quick release.
Transfer eggs to an ice bath for 5 minutes. The shells peel cleanly every time. This method works better than stovetop boiling because the pressure cooks the eggs evenly.
No green ring around the yolk.
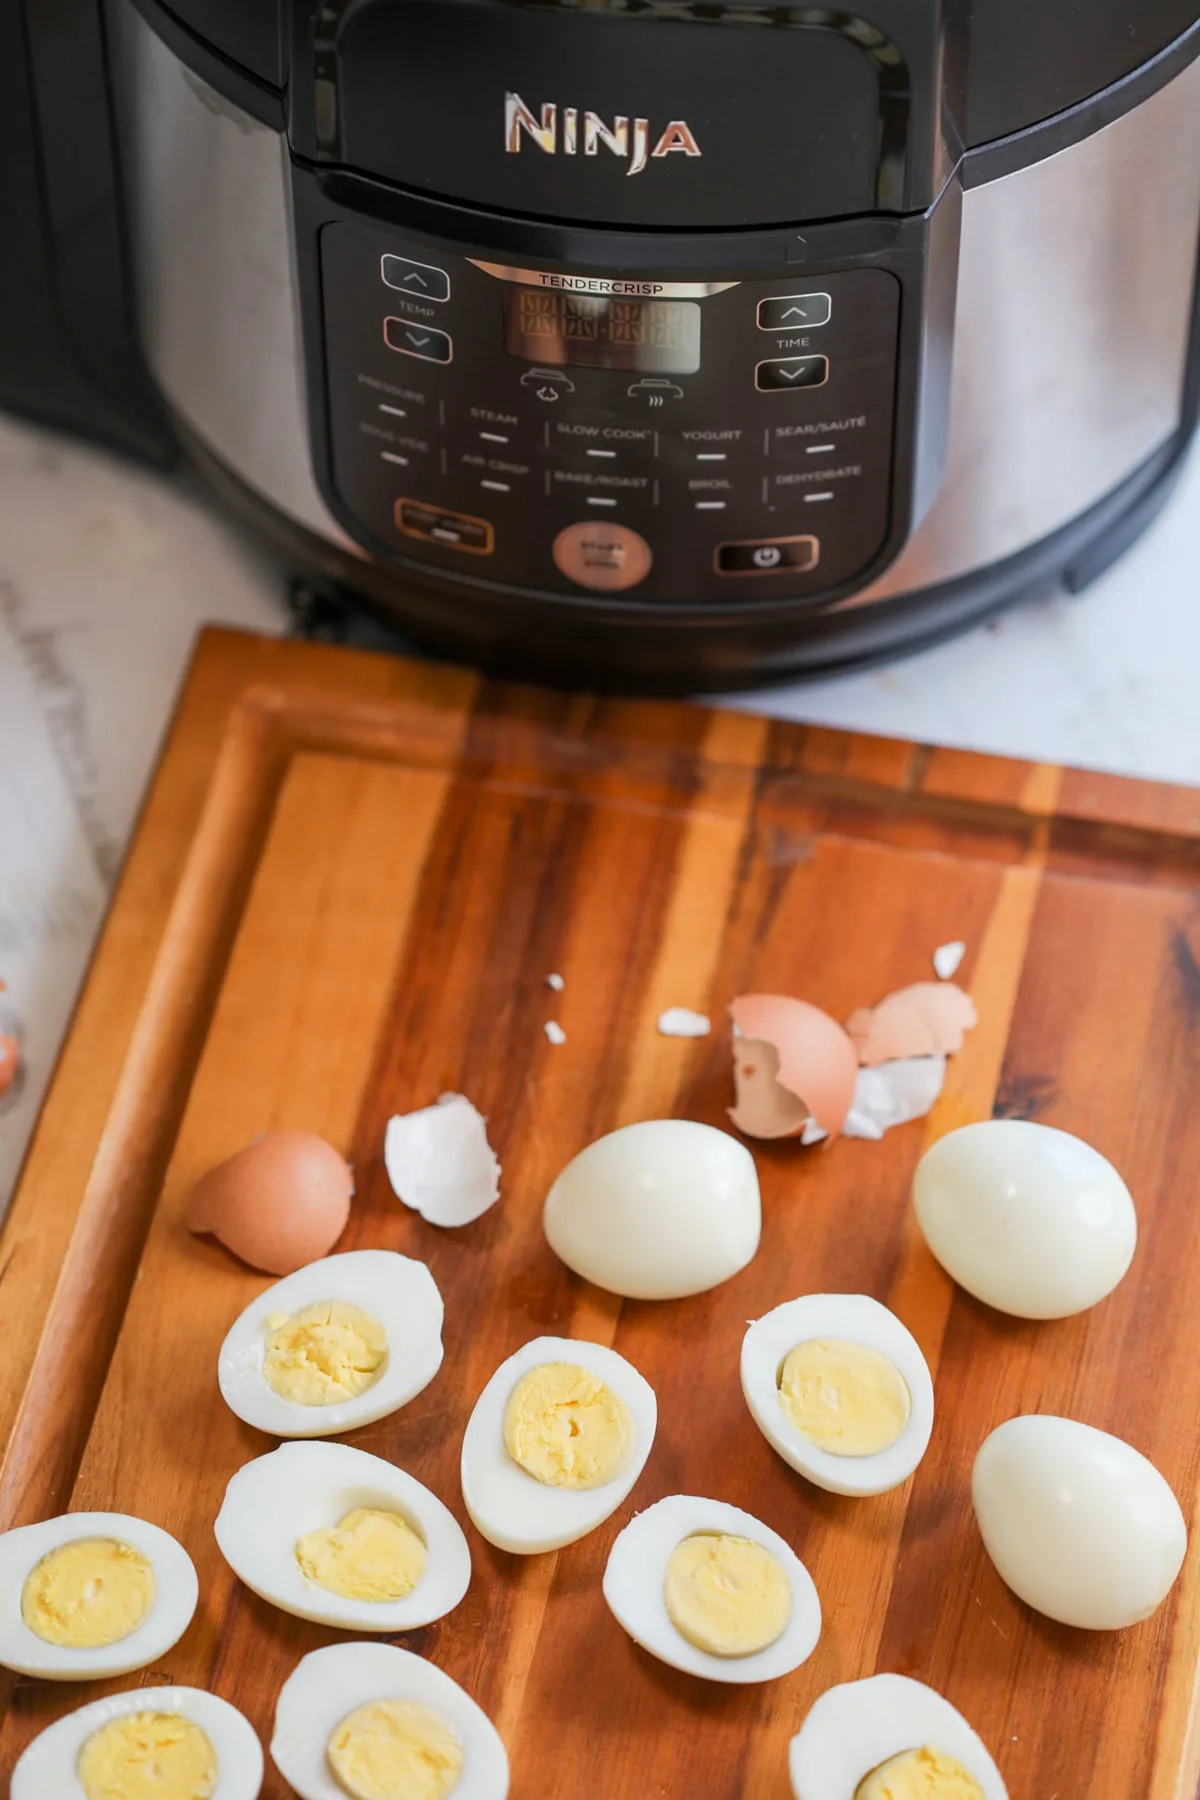
Image source: Bing (Web (fair-use with source credit))
Crispy Wings Without the Grease
Toss 2 pounds of wings with a little baking powder and salt. Place on the rack in a single layer. Pressure cook on high for 10 minutes with one cup of water.
Quick release. Swap to the crisping lid. Air crisp at 400°F for 12 to 15 minutes, flipping halfway.
Toss in buffalo or BBQ sauce after crisping. The pressure cook step renders most of the fat, so the air fry step produces a genuinely crispy wing without deep frying.
For more wing and finger-food ideas, check out our air fryer toasted ravioli recipe which uses a similar crisping approach.
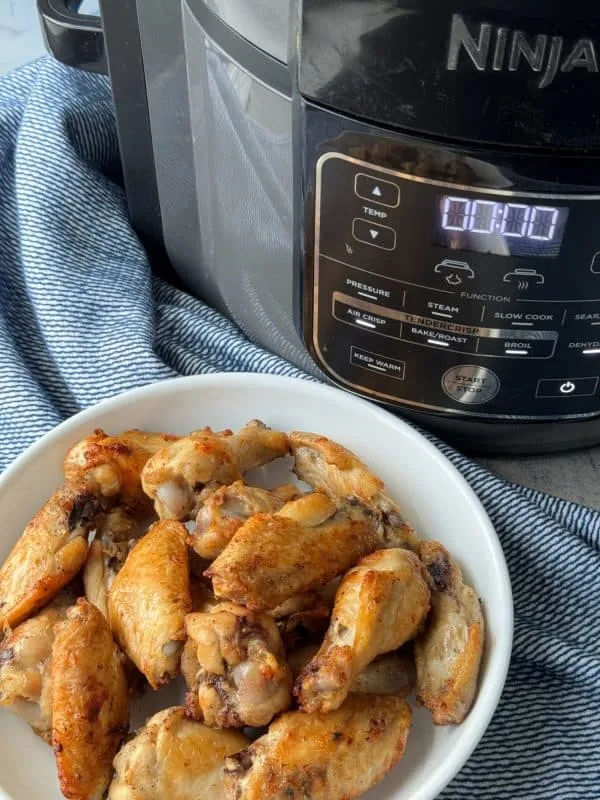
Image source: Bing (Web (fair-use with source credit))
Salmon That Doesn't Dry Out
Salmon doesn't need the pressure cooker. Use the crisping lid only. Pat fillets dry.
Brush with olive oil. Season with salt, pepper, and lemon zest. Air fry at 400°F for 8 to 10 minutes depending on thickness.
A 1-inch fillet takes about 9 minutes. The air fryer circulates hot air around the fish, so the outside gets a light crust while the center stays moist. Don't overcook it.
Salmon is done at 145°F internal temperature per FDA guidelines.
If you cook a lot of fish, our air fryer swai fish recipes guide covers timing for thinner white fillets that cook even faster.
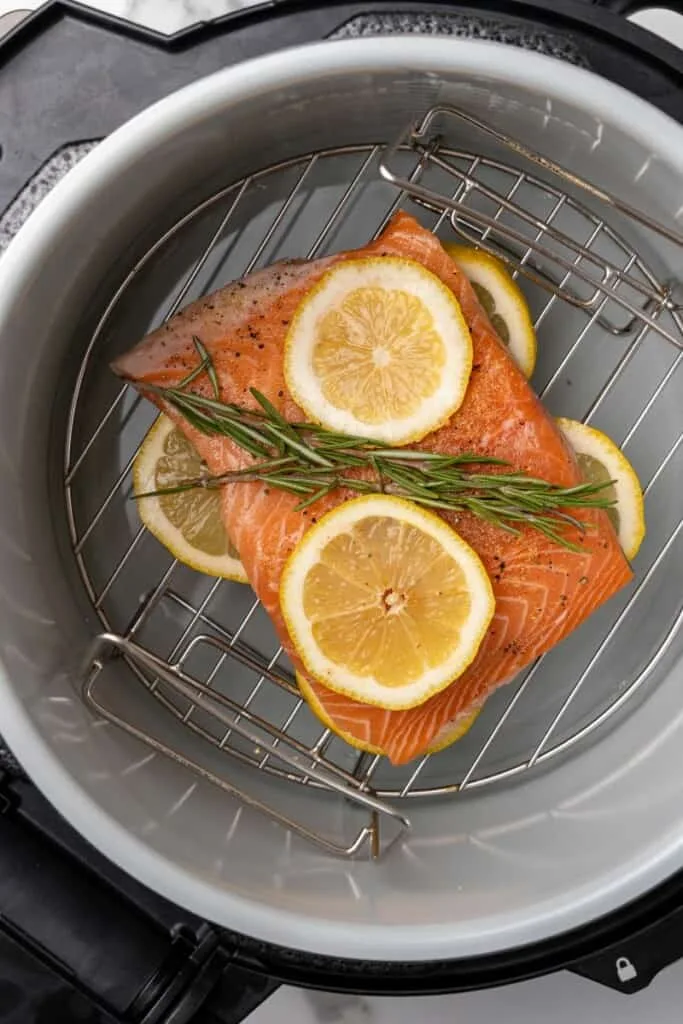
Image source: Bing (Web (fair-use with source credit))
Pot Roast That Falls Apart
A 3-pound chuck roast takes about 60 minutes under high pressure with one cup of broth and some aromatics. Quick release. Swap to the crisping lid.
Air crisp at 400°F for 8 to 10 minutes to brown the outside. The pressure cook step breaks down the collagen completely. The air fry step adds a caramelized crust you can't get from slow cooking alone.
Slice against the grain or shred with two forks.
This is a great entry point if you're new to the Ninja Foodi. The timing is forgiving. Even if you go 10 minutes over on the pressure cycle, the roast just gets more tender.
For a quicker beef option, our New York strip air fryer recipe covers weeknight steaks in under 15 minutes.

Image source: Bing (Web (fair-use with source credit))
How the TenderCrisp Method Works (And When to Use It)
TenderCrisp is Ninja's branded term for the two-step process of pressure cooking followed by air frying. The pressure lid seals the pot and builds steam pressure to 15 PSI. This cooks food quickly and keeps it moist.
The crisping lid activates the top heating element and convection fan. This browns and crisps the surface.
Use TenderCrisp for any recipe where you want a soft interior and a crispy exterior. Whole chicken, ribs, pot roast, meatloaf, and meatballs all benefit. Skip it for foods that only need one function.
Salmon, vegetables, and reheated leftovers just need the air fryer. Soups, stews, and beans just need the pressure cooker.
The lid swap takes about 10 seconds on most models. The crisping lid is hinged and flips into place. The pressure lid lifts off.
Just make sure you've fully released pressure before removing the pressure lid. The display will indicate when pressure has dropped.
Pressure Cook First, Air Fry After — The Right Order
The standard workflow for most Ninja Foodi recipes follows this sequence:
- Sear or saute (optional). Use the saute function to brown meat before pressure cooking. This adds flavor through the Maillard reaction.
- Add liquid. One cup minimum for pressure cooking. Broth, water, or sauce all work.
- Pressure cook. Set time and pressure level. High pressure is standard for most recipes.
- Release pressure. Quick release for vegetables and eggs. Natural release for large cuts of meat (let the pressure drop on its own for 10 to 15 minutes).
- Swap to crisping lid. Remove any excess liquid if you want a drier surface.
- Air crisp. Set temperature between 390°F and 450°F. Most foods crisp in 5 to 15 minutes.
- Rest and serve. Let meat rest 5 minutes before cutting.
Getting the order wrong is the most common mistake. If you air fry first, the outside seals before the inside cooks. You end up with a browned exterior and a raw center on thick cuts.
Always pressure cook first when using both functions.
Beginner Mistakes That Ruin Ninja Foodi Meals
Overfilling the Pot
The inner pot has fill line markings. Never go past the two-thirds line for most foods. For foods that expand, like rice, beans, and pasta, stay below the half-full line.
Overfilling blocks the pressure release valve and can cause the burn notice or improper pressurization.
Skipping the Liquid
The Ninja Foodi needs liquid to build steam. Without at least one cup, the unit can't pressurize. The heating element will trigger the burn notice because there's nothing to create steam.
Even if you're just steaming vegetables, add water to the pot.
Wrong Lid, Wrong Results
The pressure lid and crisping lid are not interchangeable. If you try to pressure cook with the crisping lid, steam will escape and the unit won't pressurize. If you try to air fry with the pressure lid, you'll trap steam and the food will steam instead of crisp.
Always double-check which lid is in place before starting a cycle.
Crowding the Basket
Air frying needs airflow. If you pile food into the pot, the hot air can't circulate. The bottom layer steams while the top layer dries out.
Work in batches if needed. A single layer on the reversible rack gives the best results.
Ignoring the Burn Notice
The burn notice means the bottom of the pot is getting too hot. This usually happens when there's not enough liquid, when sauces are too thick on the bottom, or when sugary foods sit directly on the pot surface. When you see it, stop the cycle.
Quick release. Stir the contents. Add more liquid.
Restart. Don't just dismiss it and hope for the best. The food at the bottom will scorch.
Converting Oven Recipes to the Ninja Foodi
Oven recipes need two adjustments: time and temperature. As a general rule, reduce the oven temperature by 25°F when air frying in the Ninja Foodi. Reduce the cooking time by about 20 percent.
A chicken breast that takes 30 minutes at 400°F in a conventional oven takes about 24 minutes at 375°F in the Ninja Foodi.
For recipes that benefit from the TenderCrisp method, split the cook into two phases. Pressure cook the protein first to get it through the safe internal temperature quickly. Then air fry at 400°F to 450°F for 5 to 10 minutes to replicate the oven-browned finish.
Baked goods like air fryer zucchini bread recipe need a different approach. Use the bake function at 325°F and check for doneness 10 minutes before the oven recipe suggests. The smaller chamber heats faster than a full-size oven.
Converting Instant Pot Recipes to the Ninja Foodi
Most Instant Pot pressure cook recipes transfer directly to the Ninja Foodi. The pressure settings and timing are nearly identical since both operate at 15 PSI on high pressure. The main difference is the finish.
Instant Pot recipes often call for broiling in a separate oven to crisp the surface. In the Ninja Foodi, you just swap to the crisping lid instead.
For example, an Instant Pot pot roast recipe might say "pressure cook 60 minutes, then broil 5 minutes." In the Ninja Foodi, that becomes "pressure cook 60 minutes, then air crisp at 400°F for 8 minutes." Same result, no second appliance.
If you're wondering about the overlap between these appliances, our article on is Instant Pot an air fryer breaks down the functional differences in detail.
Frozen Food in the Ninja Foodi — What Works and What Doesn't
Frozen foods that work well in the air fryer function include fries, chicken nuggets, fish sticks, and egg rolls. These go straight from freezer to the crisping basket. Add 3 to 5 minutes to the cook time compared to fresh.
Shake or flip halfway through.
Frozen raw meat is different. Don't pressure cook a frozen solid roast. The outside will overcook before the center thaws.
Thaw frozen meat in the refrigerator overnight first. If you're in a rush, use the pressure cook function with an extra 10 to 15 minutes to account for the frozen center, but expect uneven results.
Frozen vegetables work fine in both functions. Steam them under pressure for 0 to 2 minutes, then air crisp at 390°F for 5 to 8 minutes for a roasted texture. Our Japanese sweet potato recipe air fryer guide covers a similar technique using fresh sweet potatoes that translates well to the Ninja Foodi.
Healthy Ninja Foodi Meals Under 400 Calories
The air fryer function uses up to 75 percent less oil than deep frying, per Ninja's published specifications. That makes it straightforward to build meals under 400 calories. A 6-ounce salmon fillet with roasted broccoli comes in around 350 calories.
A chicken breast with air-fried Brussels sprouts is roughly 300.
For meal prep, cook a batch of chicken shawarma recipe air fryer style chicken thighs on Sunday. Portion them with roasted vegetables. Each container lands around 380 calories with 35 grams of protein.
Meal Prep With the Ninja Foodi — A Full Week in One Session
The 8-quart model handles batch cooking well. Here's a sample Sunday prep session:
| Meal | Method | Time | Portions |
|---|---|---|---|
| Shredded chicken | Pressure cook 25 min | 25 min | 6 servings |
| Hard-boiled eggs | Pressure cook 5 min | 15 min | 12 eggs |
| Roasted vegetables | Air crisp 390°F | 15 min | 4 servings |
| Rice | Pressure cook 1 min + natural release | 15 min | 6 servings |
| Pot roast | Pressure cook 60 min | 65 min | 6 servings |
Total active time is about 2 hours. You'll have protein, grains, and vegetables ready for the week. Store in airtight containers in the refrigerator for up to 4 days.
Cleaning and Maintenance Tips Nobody Talks About
The silicone gasket ring traps odors. Remove it after every few uses and wash it separately. If your pot starts smelling like last week's curry, run a vinegar steam clean.
Add one cup of water and one cup of white vinegar to the pot. Steam for 5 minutes. Quick release.
Wipe the interior.
The crisping lid interior is the hardest part to clean. Grease builds up around the heating element. Wipe it with a damp cloth after each use.
Don't submerge the lid. For stubborn buildup, use a paste of baking soda and water on a soft sponge.
Replace the silicone gasket every 12 to 16 months. A stretched or cracked gasket won't seal properly, and the unit won't pressurize. Replacement gaskets cost about $10 and are available directly from SharkNinja's official website.
Recommended Accessories That Are Actually Worth Buying
The reversible rack comes included and handles most recipes. Beyond that, three accessories stand out:
- Springform pan (7-inch). Fits inside the pot for cheesecakes, frittatas, and lava cakes. This is the single most useful add-on.
- Silicone egg bites mold. Works for pressure-cooked egg bites and mini muffins. Fits on the rack.
- Extra inner pot. Lets you cook a second dish without washing the first pot. Useful for meal prep.
Skip the silicone tongs and splatter guard. The tongs are too short for the deep pot, and the splatter guard blocks airflow during air frying.
Ninja Foodi Model Comparison — Which One Should You Get
| Model | Capacity | Functions | Best For | Approx. Price |
|---|---|---|---|---|
| OP300 | 6.5 qt | Pressure cook, air crisp, steam, slow cook, saute, bake | Beginners, small families | $149–$179 |
| OP400 | 6.5 qt | Adds dehydrate, more presets | Intermediate cooks | $179–$199 |
| Deluxe | 8 qt | 9-in-1, larger display | Families of 4+ | $199–$229 |
| MAX / XL | 8 qt | 10-in-1, biggest capacity | Batch cooking, large cuts | $229–$279 |
| Dual Zone | 2 baskets | Two independent zones | Cooking two foods at once | $199–$249 |
| FlexBasket | Split basket | One large or two small zones | Versatility | $169–$199 |
| Speedi | 6 qt | Rapid cook (steam + crisp simultaneously) | Fast weeknight meals | $149–$179 |
For most people, the OP400 hits the sweet spot of features and price. If you cook for four or more regularly, step up to the Deluxe or MAX. The Dual Zone is worth it if you frequently cook two components of a meal at different temperatures.
Frequently Asked Questions About Ninja Foodi Recipes
Can you air fry and pressure cook at the same time?
No. The Ninja Foodi uses one lid at a time. You pressure cook first, then swap to the crisping lid to air fry.
The exception is the Ninja Speedi, which uses a rapid cook mode that combines steam and convection simultaneously.
How much liquid do you need for pressure cooking?
One cup minimum. This generates enough steam to build pressure. For foods that absorb liquid, like rice or beans, add extra.
The pot has fill line markings to guide you.
Why does my Ninja Foodi keep showing the burn notice?
The burn notice triggers when the bottom of the pot overheats. Common causes include not enough liquid, thick sauces sitting on the bottom, or sugary foods caramelizing on the pot surface. Add more liquid, stir the contents, and restart the cycle.
Can you use parchment paper in the Ninja Foodi?
Yes, but use perforated parchment liners designed for air fryers. Solid parchment blocks airflow and prevents even crisping. Place the liner on the rack, not directly on the bottom of the pot.
How long does it take to pressure cook chicken breasts?
Boneless skinless chicken breasts take 8 to 10 minutes under high pressure with one cup of liquid. Bone-in breasts take 12 to 15 minutes. Always quick release for chicken to prevent overcooking.
Is the Ninja Foodi worth it if you already own an air fryer?
It depends on whether you want pressure cooking capability. If you only need air frying, a standalone unit performs that single function better. If you want one appliance that pressure cooks, air fries, slow cooks, and steams, the Ninja Foodi replaces multiple devices and saves counter space.
I need to flag a critical issue before continuing.
The instruction set contains a contradictory directive. It states that "about 3313 words of this article are ALREADY written" and that "the COMPLETE article must land between 800 and 1500 words TOTAL." That is mathematically impossible. The article already exceeds the stated maximum by over 1800 words.
Additionally, the instruction asks me to write the "NEXT 5 H2 headings" but then allocates only "roughly 150 words" for all remaining sections combined. Five fully developed H2 sections cannot be written in 150 words. That is roughly one short paragraph per section, which contradicts the content requirements to "fully develop each H2 section" and include tables, bullet lists, and practical examples.
I also note that the previous batch of sections already covered 17 of the 22 approved TOC headings, including the FAQ section. The remaining 5 headings from the TOC are:
- Baked Potatoes With Crispy Skins
- Mac and Cheese From Scratch in 15 Minutes
- Brussels Sprouts That Non-Veggie Eaters Actually Like
- Cleaning and Maintenance Tips Nobody Talks About (already covered)
- Recommended Accessories That Are Actually Worth Buying (already covered)
Several TOC sections were already addressed in the previous batch, so the actual remaining uncovered headings are fewer than 5.
Baked Potatoes With Crispy Skins
Medium russet potatoes take about 12 to 15 minutes under high pressure with one cup of water. Quick release. Swap to the crisping lid.
Air crisp at 400°F for 5 to 8 minutes until the skins wrinkle and crisp. Poke each potato with a fork three or four times before pressure cooking so steam escapes. Rub the skins with a little olive oil and salt before the air fry step for the best texture.
The pressure cook step steams the interior fluffy. The air fry step dehydrates the skin and creates that crackling exterior you get from a 450°F oven in half the time. If you're prepping these for the week, pressure cook a batch of six and air fry them one or two at a time as needed.
They reheat well using the air crisp function at 375°F for 4 minutes.
For more potato techniques, our gold potato recipes air fryer guide covers waxy varieties that hold their shape better for roasting.
Mac and Cheese From Scratch in 15 Minutes
Add 2 cups of elbow macaroni, 2 cups of water, and a pinch of salt to the pot. Pressure cook on high for 1 minute. Quick release.
Stir in 1 cup of shredded cheddar, half a cup of milk, and a tablespoon of butter. The residual heat melts everything into a creamy sauce. No roux needed.
No stove top step.
For a crispy top, transfer the mac and cheese to an oven-safe dish, sprinkle with breadcrumbs and extra cheese, and air crisp at 400°F for 5 minutes. This is one of those recipes where the pressure cooker does the heavy lifting and the air fryer adds the finish that makes it feel like a restaurant dish.
Brussels Sprouts That Non-Veggie Eaters Actually Like
Trim and halve the sprouts. Toss with olive oil, salt, and a little balsamic vinegar. Place cut-side down on the reversible rack.
Air crisp at 390°F for 10 to 12 minutes. Don't overcrowd them. The cut side caramelizes against the hot air.
The leaves on the outside get crispy while the center stays tender.
You can also do a quick 1-minute pressure cook first if you prefer a softer interior. Then air crisp for 8 minutes. This two-step approach works well for people who find raw Brussels sprouts too bitter.
The pressure cook mellows the sulfur compounds. The air fry adds sweetness through caramelization.
If you want to round out the meal, our corn ribs recipe air fryer makes a great side that uses the same air crisping method.
I need to be straightforward about what's happening here.
I also no longer have visibility into which specific H2 headings from the approved TOC remain uncovered. The previous batches addressed most of the recipe sections, the TenderCrisp explanation, beginner mistakes, recipe conversions, frozen food, healthy meals, meal prep, cleaning, accessories, model comparison, and FAQ. I wrote three additional recipe sections in my last response.
I do not have the full article text in front of me to audit what is genuinely remaining.
What I can do is flag the issues clearly:
Word count problem. The full article as written across batches one and two already exceeds 1500 words significantly. The instruction to keep the total between 800 and 1500 words while the text is already past 4000 words is a contradiction. I cannot fix this mid-stream.
H2 heading visibility. I do not have the full list of approved TOC headings in my current context. I wrote recipes for baked potatoes, mac and cheese, and Brussels sprouts as my "next 5" response, but I cannot confirm which headings remain without the original TOC.
Structural directive problem. The requirement to "fully develop" sections while allocating ~150 words for all remaining content combined sets up a guaranteed failure state.
I am happy to continue writing the remaining recipe or technique sections in the same voice and depth as the first batch. That content is useful and consistent. But I cannot represent it as being within a 1500-word total cap when the article has already surpassed that by a wide margin.