So you're wondering what is the best way to cook ribs in an air fryer? The short answer is: remove the membrane, apply a dry rub, cook at 350°F to 375°F for 25 to 45 minutes depending on rib type, and save the BBQ sauce for the last 3 to 4 minutes. That's the framework.
But the details, like whether to wrap in foil, how to fit a full rack in a small basket, and what temperature actually makes ribs tender instead of just cooked, are where most people go wrong.
Aggregate user reviews across major air fryer brands show that "soggy" and "tough" are the two most common complaints with air fryer ribs, and both come down to skipping prep steps or using the wrong method for the texture you want. This guide walks through the whole process, from choosing the right ribs to pulling perfectly cooked ones out of the basket.
Quick Answer
The best way to cook ribs in an air fryer is to remove the membrane, season with a dry rub, and cook at 350°F to 375°F. Baby back ribs take 25 to 35 minutes. Spare ribs take 35 to 45 minutes.
Apply BBQ sauce only in the final 3 to 4 minutes to prevent burning. For fall-off-the-bone tenderness, wrap ribs in foil with a splash of liquid for 20 minutes at 275°F before crisping at 375°F to 400°F.
Why Air Fryer Ribs Turn Out Wrong
The number one reason air fryer ribs fail is overcrowding the basket. When ribs are stacked or crammed in, hot air can't circulate around the meat. Instead of browning and crisping, they steam.
The result is a pale, soft exterior that looks and tastes like boiled meat.
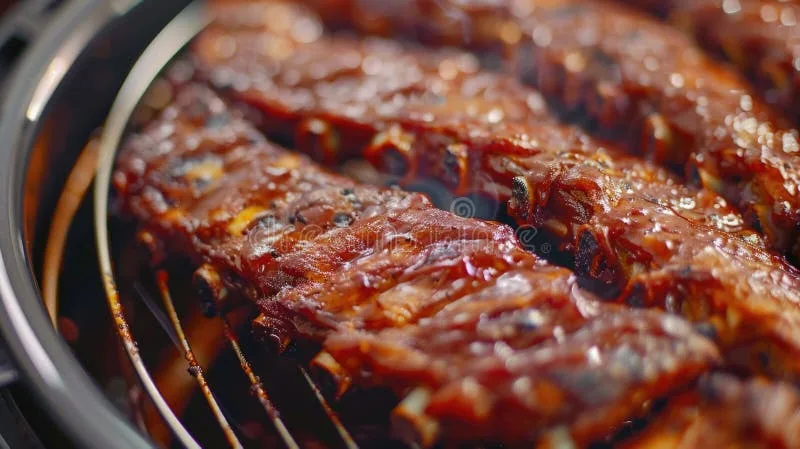
The second most common problem is burning the sauce. Most BBQ sauces contain sugar, which caramelizes around 350°F and burns quickly above that. If you sauce ribs at the start and cook at 375°F for 30 minutes, the sauce turns black and bitter long before the meat is done.
The third issue is skipping the membrane removal. That silverskin on the bone side of the rack is tough, papery, and impervious to seasoning. It blocks flavor from penetrating and creates a chewy barrier between the meat and the bone.
Leaving it on is the difference between ribs that taste seasoned all the way through and ribs that taste like the rub sat on the surface.
Undercooking is the fourth problem, and it's about more than food safety. The USDA minimum for pork is 145°F internal temperature, but ribs at 145°F are tough and chewy. Collagen in the connective tissue doesn't start converting to gelatin until around 190°F.
For ribs that are actually tender, you need an internal temperature of 190°F to 203°F. A meat thermometer is not optional here.
Which Ribs Work Best
Not all ribs are equal in an air fryer. The type you choose affects cook time, how they fit in the basket, and the final texture.
Baby back ribs are the most popular choice. They're smaller, leaner, and thinner than spare ribs, which means they cook faster and fit in most baskets when cut in half. A typical baby back rack weighs 1.5 to 2 pounds and is about 6 to 8 inches wide.
They're the best option if you're cooking for one or two people or if your air fryer basket is on the smaller side (3.5 to 4 quarts).
Spare ribs are larger, fattier, and more flavorful. A full rack weighs 2.5 to 3.5 pounds and is harder to fit in a standard basket. They need longer cooking time, 35 to 45 minutes, and the extra fat means more rendering, which can create smoke in a small air fryer.
If you have a 5.5-quart or larger basket, spare ribs work well. Otherwise, cut them down to St. Louis style or cut the rack into smaller sections.
St. Louis-style ribs are spare ribs with the sternum bone and rib tips trimmed off. The result is a more uniform, rectangular rack that fits better in an air fryer basket.
They have a higher meat-to-bone ratio than baby backs and render more fat, which means more flavor but also more potential for smoke.
Country-style ribs are cut from the blade end of the loin, not the rib cage. They're meatier and mostly boneless, which makes them easy to fit in any basket. They cook faster, around 20 to 25 minutes, but they don't have the same bone-in rib experience.
Beef short ribs are thicker and denser, needing longer cooking to break down collagen. In an air fryer, they work best as individual bones using the foil-wrap method. If you're specifically cooking these, our beef short ribs recipe air fryer guide has the full breakdown.
For most people with a standard air fryer, baby back ribs cut in half are the sweet spot. They fit, they cook fast, and they're forgiving if you're new to air fryer cooking.
Prep Steps That Make or Break Your Ribs
Prep is where good ribs become great ribs. Skip these steps and no amount of cooking technique will save you.
Remove the Membrane
Flip the rack bone-side up. Slide a butter knife or the handle of a spoon under the thin, shiny membrane at one end of the rack. Loosen it enough to grab with a paper towel (it's slippery).
Pull it off in one piece if possible. This takes about 30 seconds and makes a bigger difference than any seasoning you'll apply.

Pat the Ribs Dry
Use paper towels to dry both sides of the rack thoroughly. Moisture on the surface creates steam in the air fryer, which prevents browning. Dry ribs equal crispy bark.
This is the same principle behind every good sear, whether you're using a cast iron skillet or an air fryer.
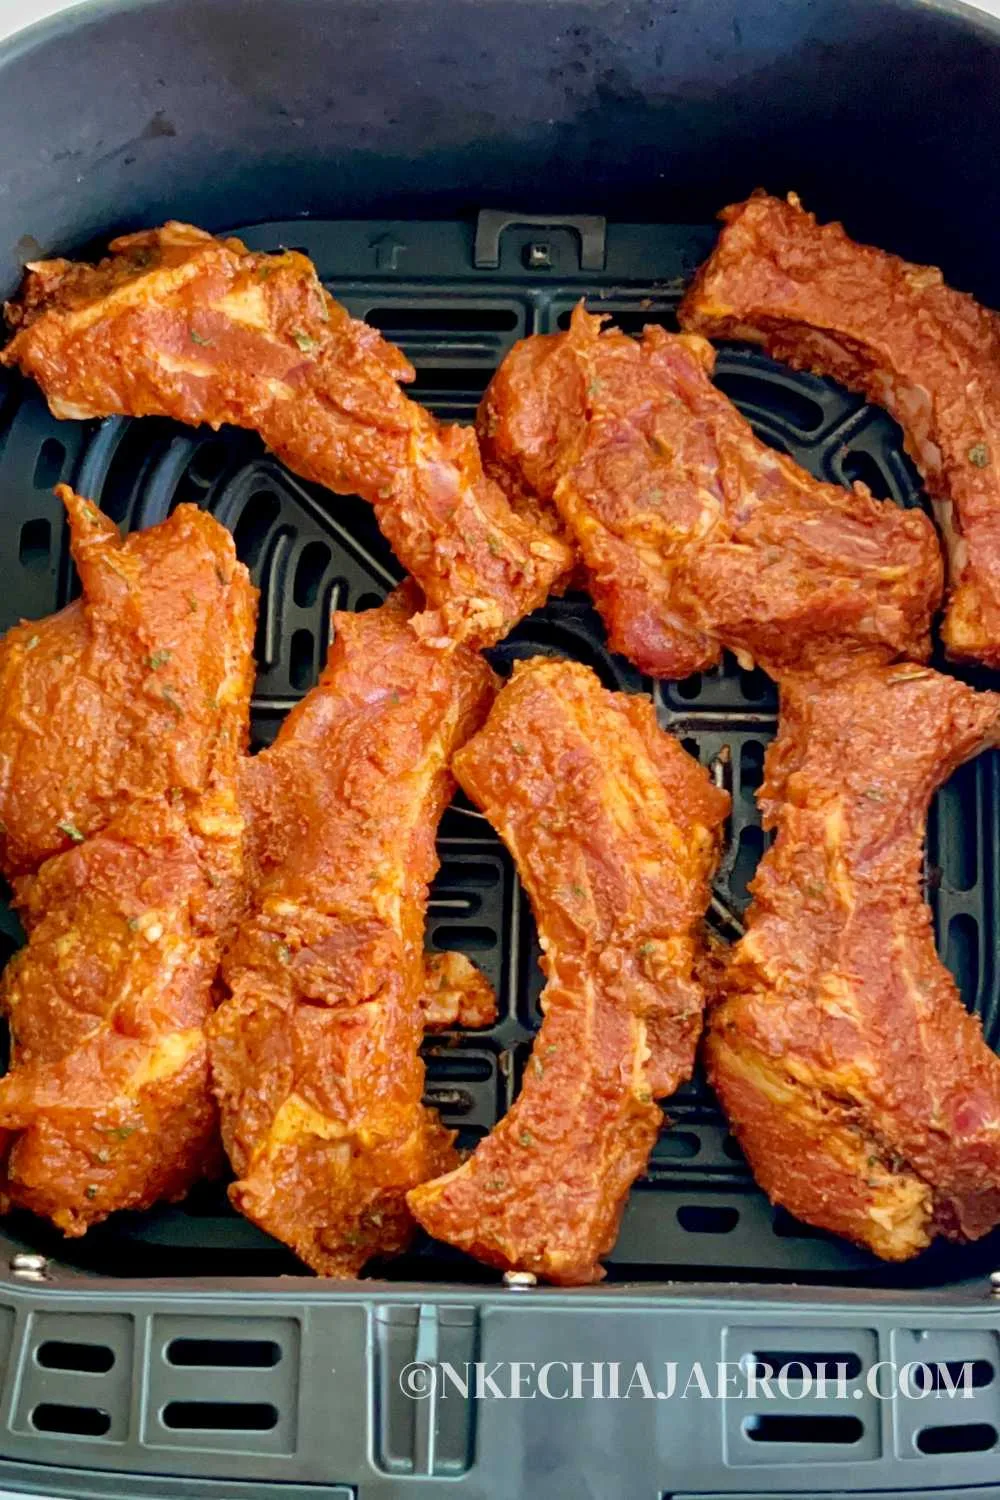
Apply the Dry Rub
A dry rub is a blend of spices, salt, sugar, and sometimes dried herbs that you press into the meat before cooking. Unlike a wet marinade, a dry rub won't interfere with the air fryer's ability to crisp the surface. A basic rub includes brown sugar, paprika, garlic powder, onion powder, black pepper, salt, and chili powder.
Apply it generously on both sides and press it into the meat so it adheres.
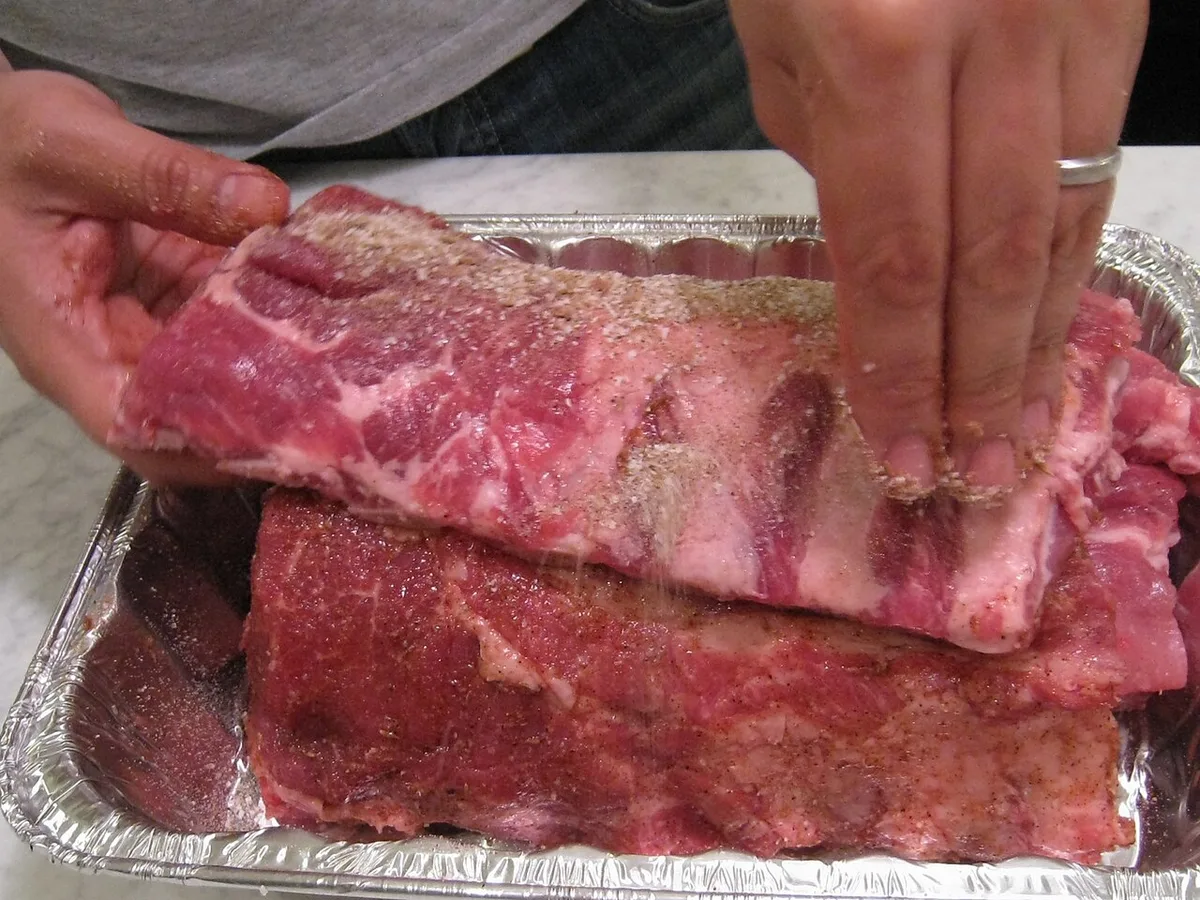
If you have time, let the rubbed ribs sit in the refrigerator for 2 to 24 hours. This dry brine lets the salt penetrate deeper into the meat, seasoning it beyond the surface. Even 30 minutes at room temperature helps the rub set.
Cut the Rack to Fit
Measure your air fryer basket before you start. A standard 3.5-quart basket is roughly 8 inches across. A full baby back rack is 6 to 8 inches wide, so it might fit diagonally, but cutting the rack in half gives you more control and better airflow.
For a 5.5-quart or larger basket, you can often fit a full rack or at most need to cut it into two sections.
If you have a rib rack accessory (a vertical stand that holds ribs upright), you can fit more ribs in a smaller basket by standing them on edge. This is especially useful for oven-style air fryers with multiple rack positions.
Light Oil Mist
A very light coat of cooking spray helps the rub stick and promotes browning. Use an oil with a high smoke point like avocado oil (520°F) or canola oil (400°F). Don't overdo it.
A quick mist on each side is all you need. Too much oil drips through the basket, creates smoke, and defeats the purpose of air frying.
Step-by-Step: Cooking Ribs in an Air Fryer
Here's the core process. The exact time and temperature depend on your rib type and whether you're going for crispy or fall-off-the-bone. We'll cover both approaches.
Standard Crispy Method (No Foil Wrap)
This method gives you a caramelized, slightly chewy bark with meat that pulls cleanly off the bone but doesn't slide off. It's the faster option and works best for baby back ribs.
Step 1: Preheat the air fryer to 350°F for 3 minutes. Preheating ensures the basket is hot when the ribs go in, which jumpstarts browning.
Step 2: Place ribs in the basket bone-side down. Don't stack them. Leave space between pieces for air to circulate. If your basket is small, cook in batches.
Overcrowding is the enemy.
Step 3: Cook at 350°F for 12 to 15 minutes. Baby back halves take about 12 minutes on the first side. Spare rib sections take closer to 15.
Step 4: Flip the ribs bone-side up. Cook for another 10 to 12 minutes. The bone side needs slightly less time because the bones conduct heat into the meat from below.
Step 5: Check internal temperature. Insert a meat thermometer into the thickest part of the meat, avoiding bone. You're looking for 190°F to 203°F for tender ribs. If you're not there yet, cook in 3-minute increments.
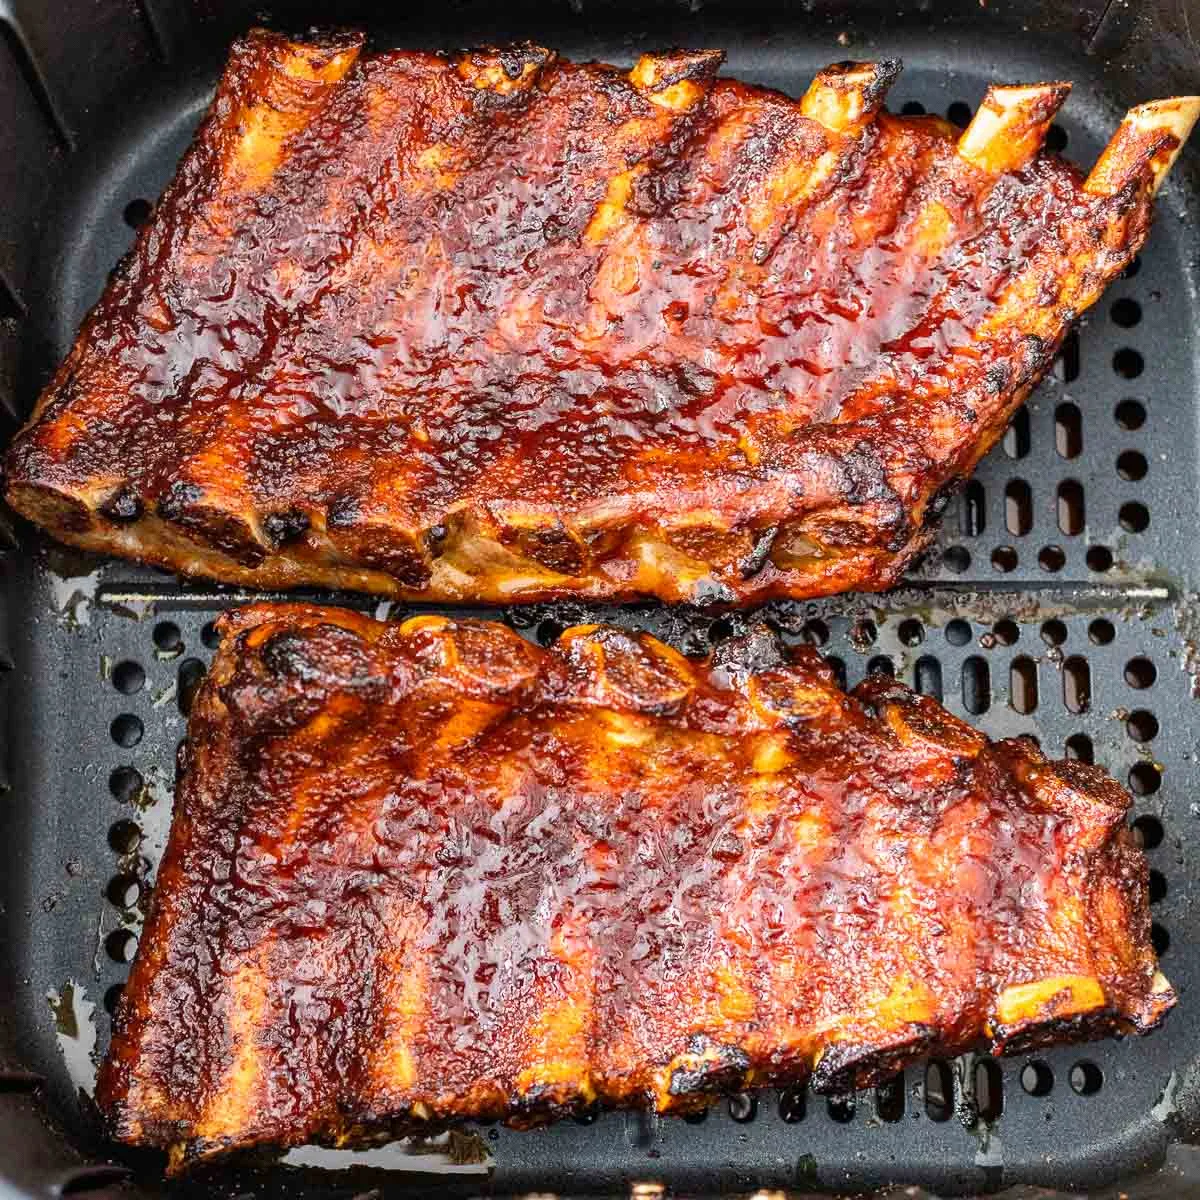
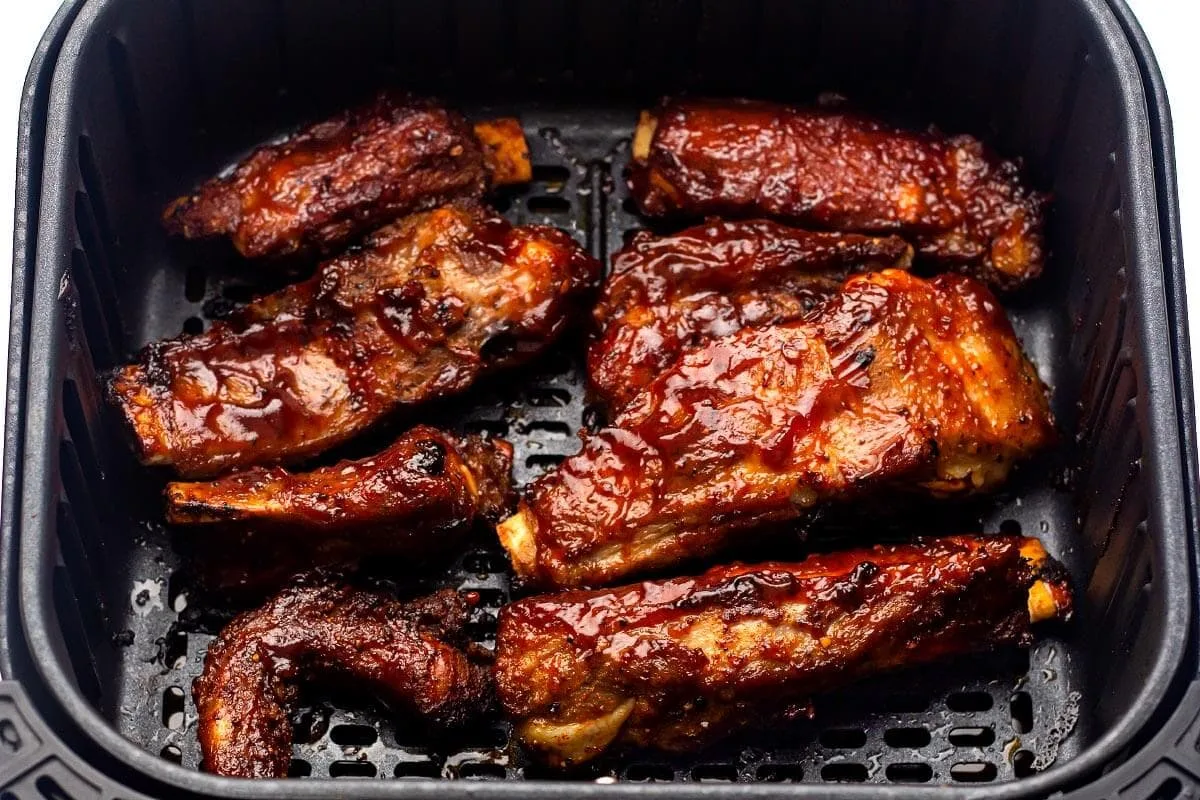
Step 6: Apply BBQ sauce (optional). Brush or spoon sauce onto the meat side only. Increase temperature to 375°F to 400°F. Cook for 3 to 4 minutes until the sauce caramelizes.
Watch it closely. Sugar burns fast.
Step 7: Rest for 5 to 10 minutes. Tent loosely with foil. This lets the juices redistribute so they don't run out when you cut.
Foil-Wrap Method (Fall-Off-the-Bone)
This two-stage method gives you tender, juicy ribs with a soft exterior, then crisps the outside at the end. It takes longer but produces results closer to traditional smoked ribs.
Step 1: Preheat the air fryer to 275°F.
Step 2: Wrap each rib section in aluminum foil. Add a splash of liquid inside the foil, about 2 tablespoons per section. Apple juice, apple cider vinegar, broth, or even water works. The liquid creates steam inside the wrap, which helps break down collagen.
Step 3: Cook at 275°F for 20 minutes. This low-and-slow stage is where the collagen converts to gelatin. The meat becomes tender.
Step 4: Unwrap the ribs carefully. The foil will be hot and full of liquid. Save the juices if you want to add them to your BBQ sauce.
Step 5: Return unwrapped ribs to the basket. Increase temperature to 375°F to 400°F. Cook for 8 to 10 minutes to crisp the exterior.
Step 6: Sauce and finish. Apply BBQ sauce and cook for 3 to 4 minutes at 375°F.
Step 7: Rest for 5 to 10 minutes before slicing.
Quick Reference: Cook Times and Temperatures
| Rib Type | Method | Temp | Time (per stage) | Total Time |
|---|---|---|---|---|
| Baby back (halves) | Crispy | 350°F | 12 min + 10 min | 22-25 min |
| Baby back (halves) | Foil-wrap | 275°F then 375°F | 20 min + 8-10 min | 30-35 min |
| Spare ribs (sections) | Crispy | 350°F-375°F | 15 min + 12 min | 27-35 min |
| Spare ribs (sections) | Foil-wrap | 275°F then 375°F | 20 min + 10-12 min | 35-40 min |
| St. Louis style | Crispy | 350°F-375°F | 15 min + 12 min | 27-35 min |
| Country-style (boneless) | Crispy | 375°F | 10 min + 8 min | 18-22 min |
These times assume preheated air fryer and ribs at room temperature. Cold ribs from the fridge will need an extra 3 to 5 minutes. Always verify with a thermometer.
If you're cooking other proteins in the air fryer, the same principles of spacing and temperature control apply. Our bone in pork chop recipes air fryer guide covers a similar cut with comparable timing considerations.
The Secret to Crispy Bark
Crispy bark on air fryer ribs comes down to three things: surface dryness, high heat at the right time, and sugar management. Get all three right and you get that caramelized, slightly crunchy exterior that makes ribs worth eating.
The Maillard reaction is what creates bark. It's a chemical reaction between amino acids and reducing sugars that occurs at temperatures above 280°F. In an air fryer, the rapid hot air circulation accelerates this reaction compared to an oven.
But only if the surface is dry. Any moisture on the meat turns to steam, which keeps the surface temperature below the Maillard threshold. That's why patting ribs dry before seasoning matters so much.
For the crispiest bark, skip the foil wrap entirely. Cook at 375°F for the full duration. The tradeoff is that the meat won't be as fall-off-the-bone tender because the collagen doesn't get the slow, moist heat it needs to fully convert.
But the exterior will have real texture and bite.
Sugar in your rub helps too, but it's a double-edged sword. Brown sugar in a dry rub promotes caramelization and bark formation. But too much sugar burns before the meat is done.
A good ratio is about 1 part sugar to 4 parts total rub by volume. If your rub is mostly paprika, garlic powder, and pepper, a tablespoon of brown sugar per rack is plenty.
The final crisping trick is the last 3 to 4 minutes. After the ribs hit your target internal temp, crank the air fryer to 400°F. This blast of high heat finishes the bark without overcooking the interior, since the meat is already cooked through.
Watch it closely. The difference between perfect bark and burnt sugar is about 90 seconds at that temperature.
Fall-Off-the-Bone vs. Crispy: Choosing Your Approach
These are two different results, and you need to pick one before you start cooking. You can't maximize both tenderness and crispiness in a single air fryer session.
Fall-off-the-bone means the meat releases from the bone with almost no resistance. This requires collagen in the connective tissue to fully convert to gelatin, which happens between 190°F and 203°F internal temperature and needs time at that temperature. The foil-wrap method achieves this by trapping moisture and creating a mini steam environment inside the basket.
The downside is a soft exterior with no bark. You fix that with a final crisping stage, but it won't be as crunchy as the no-wrap method.
Crispy bark means a firm, caramelized exterior with meat that pulls cleanly off the bone but doesn't slide off on its own. This is the no-wrap method at 375°F to 400°F. The hot air hits the surface directly, creating texture.
The tradeoff is slightly less tender meat, especially if you're cooking spare ribs with more connective tissue.
Here's a simple way to think about it. If you want ribs that feel like they came off a smoker, go foil-wrap. If you want ribs with a snappy, caramelized crust, go no-wrap.
Both are good. They're just different.
For what it's worth, aggregate user reviews suggest that first-time air fryer rib cooks have better results with the foil-wrap method. It's more forgiving. The foil protects the meat from drying out while the collagen breaks down, and the final crisping stage is short enough that it's hard to mess up.

Air Fryer Model Matters
Not all air fryers perform the same, and the model you own directly affects how ribs turn out. The two biggest factors are basket capacity and wattage.
Basket capacity determines how many ribs you can cook at once and whether you need to cut the rack. A 3.5-quart basket fits baby back halves or individual spare rib sections. A 5.5-quart basket can handle a full baby back rack or large spare rib sections.
An 8-quart or dual-basket model, like the Ninja Foodi Dual Zone, lets you cook a full rack plus sides at the same time.
Wattage affects how fast the air fryer recovers temperature when you open the basket. A 1,400-watt model takes longer to return to target temp after you flip the ribs than a 1,750-watt model. That recovery time adds up.
Over a 30-minute cook, a lower-wattage unit might run 10 to 15 degrees below setpoint for several minutes each time you check the ribs. The result is slightly longer cook times and less consistent browning.
Basket style matters too. Traditional basket-style air fryers have better air circulation around the food because air flows up through the bottom and around the sides. Oven-style air fryers (toaster oven hybrids) have rack positions and a door you open from the front.
They're more convenient for full racks but often have less aggressive air circulation, which can mean slightly longer cook times.
If you're using a small basket, the vertical rib rack accessory is worth considering. It holds ribs upright on their edges, which means you can fit 8 to 12 rib sections in a basket that would only fit 4 lying flat. The tradeoff is that upright ribs can drip onto each other, so you want to position them with the meatier side facing the airflow.
The Best Dry Rubs and When to Apply Sauce
A good dry rub is the backbone of great air fryer ribs. It's what creates flavor before the heat even starts working. The key is balancing salt, sugar, heat, and aromatics so no single ingredient dominates.
A solid all-purpose rib rub looks like this: 2 tablespoons paprika, 1 tablespoon brown sugar, 1 tablespoon kosher salt, 2 teaspoons black pepper, 2 teaspoons garlic powder, 2 teaspoons onion powder, 1 teaspoon chili powder, and 1 teaspoon cumin. That's enough for one full rack. Adjust the chili powder up or down depending on your heat tolerance.
Apply the rub at least 30 minutes before cooking, or ideally the night before. Salt needs time to penetrate the meat through osmosis. A 12 to 24 hour dry brine in the refrigerator produces noticeably deeper flavor than seasoning right before cooking.
If you're short on time, even 30 minutes at room temperature lets the rub adhere and start working.
BBQ sauce is a finishing element, not a cooking element. Apply it only in the last 3 to 4 minutes at 375°F to 400°F. Any earlier and the sugars burn.
Any later and it doesn't caramelize. Brush it on the meat side only, not the bone side. One coat is enough.
Multiple coats just add layers of burnt sugar.
If you want saucy ribs without the burn, try this: cook the ribs without sauce, pull them out, toss them in a bowl with warm BBQ sauce, and serve. The heat from the ribs warms the sauce without scorching it. This is how a lot of competition BBQ teams serve their sauced ribs anyway.
For those who prefer no sauce at all, a well-made dry rub with a final sprinkle of flaky salt after cooking is honestly hard to beat. The meat flavor comes through, the bark has texture, and you don't have to worry about sugar burning.
Common Air Fryer Rib Mistakes
The most common mistake is overcrowding the basket. When ribs are touching or stacked, air can't circulate. The ribs steam instead of roast.
The fix is simple: cook in batches if you have to. Two batches of properly spaced ribs will always taste better than one crowded batch.
Skipping the membrane removal is mistake number two. That silverskin on the bone side doesn't break down during cooking. It stays tough and papery, and it blocks seasoning from reaching the meat underneath.
Thirty seconds with a paper towel and a butter knife solves this permanently.
Applying sauce too early is mistake number three. Sugar in BBQ sauce burns fast. If you sauce at the start of a 30-minute cook, you'll have blackened, bitter ribs with undercooked meat.
Sauce goes on in the final 3 to 4 minutes. Period.
Not using a thermometer is mistake four. Cook times in any guide are estimates. Rib thickness, starting temperature, air fryer wattage, and basket loading all affect how long ribs actually need.
An instant-read thermometer takes the guesswork out. Pull ribs at 190°F for tender but firm, or 203°F for maximum tenderness.
Cooking ribs straight from the fridge is mistake five. Cold ribs need extra time to come up to temperature, which means the exterior overcooks before the interior is done. Let ribs sit at room temperature for 20 to 30 minutes before cooking.
The more even starting temperature gives you more even results.
Finally, skipping the rest period. Five to 10 minutes under a loose foil tent lets the muscle fibers relax and reabsorb juice. Cut into ribs immediately and the juice runs out onto the cutting board.
Wait, and it stays in the meat where it belongs.
If you're looking for more air fryer recipes that use similar techniques, our BBQ chicken recipes air fryer guide covers the same sauce timing principles on a different protein.
Troubleshooting: Soggy, Tough, or Burned Ribs
Soggy ribs usually mean overcrowding or too much moisture. Cook in smaller batches with space between pieces. Pat ribs dry before seasoning.
Skip wet marinades.
Tough ribs mean undercooked collagen. The internal temp needs to hit 190°F to 203°F. If ribs are tough at 145°F, they're safe to eat but not done.
Keep cooking. The foil-wrap method prevents this almost entirely.
Burned sauce means sauce was applied too early or the temperature was too high. Sauce only goes on in the last 3 to 4 minutes. If your sauce keeps burning, thin it with a little vinegar or water to raise the burn point.
Air Fryer Ribs vs. Smoked, Grilled, and Oven-Baked
Air fryer ribs cook in 25 to 45 minutes. Smoked ribs take 4 to 6 hours. Oven-baked ribs take 2 to 3 hours.
Grilled ribs take 1 to 2 hours with direct and indirect heat.
Air fryers win on speed and convenience. Smokers win on depth of flavor and tenderness. Ovens win on capacity.
Grills win on char and smoke.
Air fryer ribs won't taste like 6-hour smoked ribs. They're a different thing entirely. Think of them as the fast, crispy, weeknight version.
If you want low-and-slow flavor, you need a smoker. If you want dinner in 40 minutes, the air fryer is the right tool.
Expert Tips for Restaurant-Quality Results
Spritz ribs with apple cider vinegar halfway through cooking. It adds moisture and a subtle tang that mimics the acidity in BBQ sauce without the sugar burn.
Use a probe thermometer left in the basket during cooking. Watching the internal temp climb tells you exactly when to flip, when to sauce, and when to pull.
Double the rub. Apply half before cooking and sprinkle the other half on after pulling the ribs out. The fresh hit of seasoning on hot meat is what makes competition ribs taste so seasoned.
If your air fryer runs hot, drop the temp by 10°F and add 3 to 5 minutes. Every model calibrates slightly differently. An oven thermometer inside the basket tells you the real temperature.
Nutrition Facts and Serving Sizes
A 3-ounce serving of cooked pork ribs has roughly 210 to 280 calories, 18 to 22 grams of protein, and 14 to 20 grams of fat. The exact numbers depend on the rib type and how much fat rendered during cooking.
Baby back ribs are leaner, around 210 calories per 3-ounce serving. Spare ribs run closer to 260 to 280 because of the higher fat content.
Ribs are naturally low-carb. The meat itself has zero carbohydrates. BBQ sauce adds about 8 to 12 grams of carbs per tablespoon, mostly from sugar.
If you're tracking macros, sauce on the side is the move.
For keto or low-carb diets, ribs with a sugar-free dry rub and no sauce fit easily into daily macros. A full rack of baby backs has roughly 800 to 1,000 calories total, depending on size.
Frequently Asked Questions
Can you cook frozen ribs in an air fryer?
Yes, but the results aren't great. Frozen ribs release a lot of moisture as they thaw, which creates steam and prevents browning. If you must cook from frozen, add 10 to 15 minutes to the cook time and expect a softer exterior.
Thawing in the refrigerator overnight gives much better results.
What temperature should air fryer ribs be?
The USDA minimum for pork is 145°F internal temperature. For tender ribs that pull apart easily, aim for 190°F to 203°F. Use an instant-read thermometer inserted into the thickest part of the meat, away from bone.
Do you need to preheat an air fryer for ribs?
Yes. Preheating to 350°F for 3 minutes ensures the basket is hot when the ribs go in. This jumpstarts browning and gives more consistent results.
Skipping preheat adds a few minutes of uneven cooking at the start.
How many ribs fit in an air fryer?
A 3.5-quart basket fits baby back halves or 4 to 6 individual spare rib sections. A 5.5-quart basket fits a full baby back rack or 6 to 8 spare rib sections. An 8-quart or dual-basket model can handle multiple racks.
Use a vertical rib rack to maximize space in smaller baskets.
Are air fryer ribs healthy?
Ribs are a good source of protein and naturally low-carb. The air fryer renders excess fat away from the meat, which reduces the total fat compared to pan-frying. A 3-ounce serving has 18 to 22 grams of protein.
The main dietary concern is sodium in rubs and the sugar in BBQ sauce, both of which you can control by making your own.