Discover the easiest way to cook delicious diced chicken using your air fryer. This guide provides a simple, step-by-step process to achieve perfectly cooked, crispy, and juicy chicken pieces. Master the art of air frying diced chicken for quick weeknight meals and versatile meal prep.
Are you looking for a quick, healthy, and delicious way to prepare diced chicken? Look no further! The air fryer is a game-changer for cooking small pieces of protein, and diced chicken is no exception. Forget dry, bland chicken or the mess of pan-frying. With your air fryer, you can achieve perfectly cooked, juicy, and delightfully crispy diced chicken in a matter of minutes. This guide will walk you through everything you need to know to master this simple yet incredibly useful cooking technique.
Whether you’re a seasoned home cook or just starting, this comprehensive guide will empower you to create amazing diced chicken. We’ll cover selecting the right chicken, essential prep steps, the perfect cooking temperatures and times, and delicious seasoning ideas. Get ready to elevate your weeknight dinners, meal prep game, and even your healthy snacking!
Key Takeaways
- Perfectly Cooked Chicken: Air frying diced chicken results in a wonderfully tender interior with delightfully crispy edges, a texture often hard to achieve with other methods.
- Speed and Convenience: This cooking method significantly cuts down on preparation and cooking time, making it ideal for busy schedules and quick meals.
- Healthy Cooking: Air fryers use significantly less oil than traditional frying methods, offering a healthier alternative for enjoying flavorful chicken.
- Versatile Application: Cooked diced chicken is incredibly versatile and can be used in salads, tacos, stir-fries, pasta dishes, wraps, and more.
- Easy Cleanup: Most air fryer baskets are non-stick and dishwasher safe, making the cleanup process remarkably simple.
- Customizable Flavor: You can easily customize the seasonings and marinades to suit your taste preferences, from simple salt and pepper to complex spice blends.
Why Air Fry Diced Chicken?
Before we dive into the “how,” let’s talk about the “why.” Air frying diced chicken offers several fantastic advantages:
- Superior Texture: The hot air circulation in an air fryer creates a crispy exterior while keeping the inside moist and tender. This is a textural marvel for small chicken pieces.
- Speed: Air fryers are incredibly fast. Diced chicken cooks much quicker than a whole breast or thigh, meaning you can have protein-ready in under 15 minutes.
- Healthier Option: Compared to deep-frying, air frying uses a fraction of the oil, making it a much healthier choice without sacrificing flavor or crispiness.
- Versatility: Once cooked, your diced chicken is ready to be tossed into salads, added to tacos, incorporated into pasta dishes, used in stir-fries, or enjoyed on its own. It’s a culinary chameleon!
- Easy Cleanup: Most air fryer baskets are non-stick and easy to clean, often being dishwasher-safe. This is a huge win for busy cooks.
Gather Your Ingredients and Equipment
Cooking diced chicken in the air fryer is straightforward. Here’s what you’ll need:

Visual guide about How to Cook Diced Chicken in the Air Fryer
Image source: melaniecooks.com
- Chicken: Boneless, skinless chicken breasts or thighs are ideal. Thighs tend to be more forgiving and stay juicier, while breasts are leaner.
- Oil: A small amount of cooking oil is necessary for crispiness and to prevent sticking. Avocado oil, olive oil, or a neutral cooking spray work well.
- Seasonings: This is where you can get creative! Salt, pepper, paprika, garlic powder, onion powder, and dried herbs are a great starting point.
- Air Fryer: Any standard air fryer will work.
- Bowl: For marinating or seasoning the chicken.
- Tongs: For safely handling the hot chicken.
Step-by-Step Guide to Air Frying Diced Chicken
Let’s get cooking! Follow these simple steps for perfectly air-fried diced chicken.
Visual guide about How to Cook Diced Chicken in the Air Fryer
Image source: melaniecooks.com
Step 1: Prepare the Chicken
The first step is to get your chicken ready for the air fryer. This involves cutting it into uniform pieces.
H3: Cutting the Chicken
Start with boneless, skinless chicken. Trim any excess fat if using chicken thighs. Cut the chicken into uniform, bite-sized pieces. Aim for cubes that are roughly 1-inch in size. Uniformity is key to ensuring even cooking. If some pieces are significantly larger or smaller than others, they won’t cook at the same rate, leading to some pieces being overcooked while others are undercooked.
Tip: For easier cutting, especially with chicken breasts, you can partially freeze the chicken for about 30 minutes. This firms it up, making it less slippery and easier to slice precisely.
Step 2: Season or Marinate the Chicken
Now comes the fun part – adding flavor! You can either quickly season the chicken or marinate it for a deeper flavor profile.
H3: Simple Seasoning Method
Place the diced chicken in a bowl. Drizzle it with about 1-2 teaspoons of oil. Toss to coat evenly. Then, add your desired seasonings. A basic but delicious combination is salt, black pepper, garlic powder, and paprika. You can also add onion powder, dried Italian herbs, chili powder, or cumin, depending on your culinary mood.
Example: For a classic flavor, try 1 teaspoon salt, 1/2 teaspoon black pepper, 1/2 teaspoon garlic powder, and 1/4 teaspoon smoked paprika per pound of chicken.
Once seasoned, ensure all the chicken pieces are coated. You can do this by tossing them in the bowl with your hands or a spoon. Spread the chicken out on a plate or parchment paper if you want to let it sit for a few minutes while your air fryer preheats.
H3: Marinating Method
If you have more time, marinating your diced chicken can infuse it with even more flavor. Marinate for at least 30 minutes, or up to a few hours in the refrigerator.
Simple Marinade Ideas:
- Lemon Herb: Olive oil, lemon juice, minced garlic, dried oregano, thyme, salt, and pepper.
- Teriyaki: Soy sauce, honey or brown sugar, grated fresh ginger, minced garlic, and a splash of sesame oil.
- Spicy Lime: Lime juice, olive oil, chili powder, cumin, garlic powder, and a pinch of cayenne pepper.
When using a marinade, you might need to slightly reduce the amount of oil you add before cooking, as the marinade already contains some. Drain off any excess marinade before air frying.
Step 3: Preheat Your Air Fryer
Preheating your air fryer is a crucial step for achieving that perfect crispy texture. It ensures the chicken starts cooking immediately and evenly.
H3: Optimal Preheating Temperature
Most recipes recommend preheating your air fryer to around 375°F (190°C) for diced chicken. This temperature is hot enough to crisp the outside quickly without drying out the inside.
How to Preheat: Place the empty air fryer basket in the air fryer. Set the temperature to 375°F (190°C) and let it run for about 3-5 minutes. Some air fryers have a specific preheat setting; otherwise, just set the temperature and timer.
Step 4: Air Fry the Diced Chicken
Now it’s time to cook! This is where the magic happens.
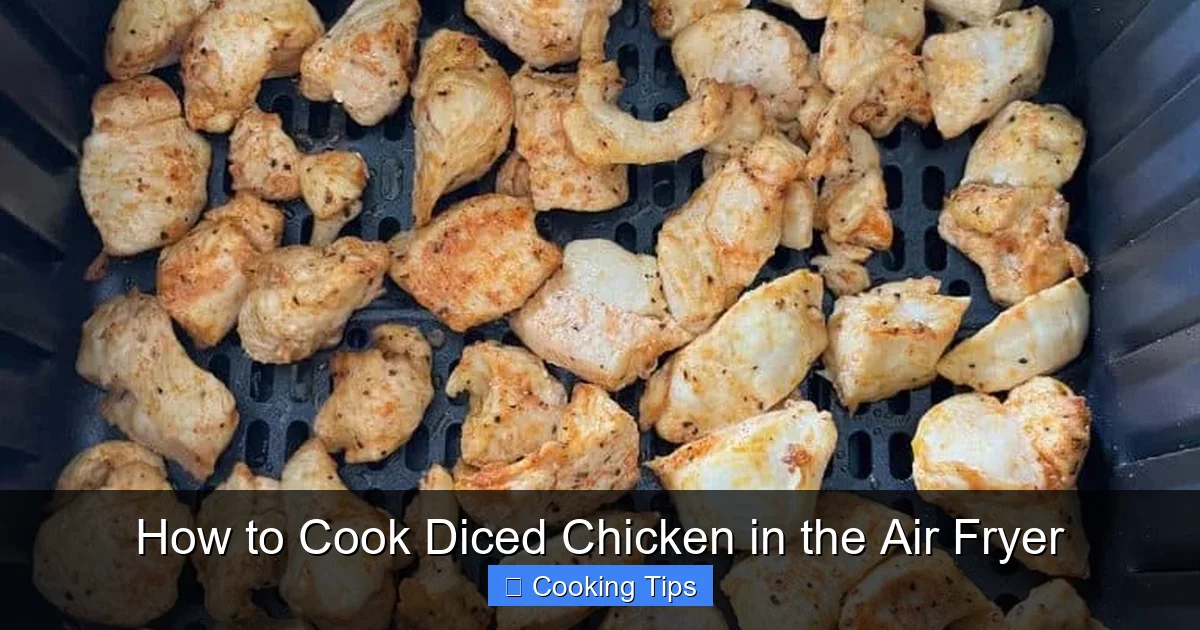
H3: Arranging the Chicken in the Basket
Once the air fryer is preheated, carefully remove the basket. Add the seasoned or marinated diced chicken to the basket in a single layer. Do not overcrowd the basket! Overcrowding will cause the chicken to steam rather than fry, resulting in a less crispy and potentially unevenly cooked product. If you have a large batch, cook in multiple batches.
Tip: For optimal crisping, ensure there is some space between each piece of chicken. This allows the hot air to circulate effectively around all sides.
H3: Cooking Time and Temperature
Place the basket back into the preheated air fryer. Set the temperature to 375°F (190°C). The cooking time will vary depending on the size of your chicken pieces and the specific air fryer model, but it typically ranges from 8 to 12 minutes.
H3: Shaking the Basket
Halfway through the cooking time, usually around the 4-6 minute mark, it’s important to shake the basket or toss the chicken with tongs. This ensures that all sides of the chicken pieces are exposed to the hot air, promoting even browning and crispiness.
H3: Checking for Doneness
After shaking, continue cooking for another 4-6 minutes. The chicken is done when it is golden brown, crispy on the outside, and cooked through. The internal temperature of the chicken should reach 165°F (74°C). You can check this with a meat thermometer. If the chicken is not yet cooked through, continue air frying in 1-2 minute increments until it reaches the desired doneness.
Visual Cues: Look for a nice golden-brown color on the pieces, and they should feel firm to the touch. The juices should run clear when you pierce a piece with a fork.
Step 5: Rest and Serve
Just like with any protein, letting the chicken rest for a few minutes after cooking can help redistribute its juices, making it even more tender and moist.
H3: Resting the Chicken
Once cooked, carefully remove the air fryer basket. Transfer the diced chicken to a clean plate or bowl. Let it rest for about 2-3 minutes before serving or incorporating it into your dish.
Troubleshooting Common Issues
Even with simple recipes, things can sometimes go slightly awry. Here are a few common issues and how to fix them:
- Chicken is Dry: This can happen if it’s overcooked or if you used very lean cuts like chicken breast without enough fat or marinade. Try reducing the cooking time slightly, and ensure you don’t overcook it past 165°F (74°C). Using chicken thighs is also a good way to combat dryness.
- Chicken is Not Crispy: This is usually due to overcrowding the basket, not preheating the air fryer, or not using enough oil. Ensure chicken is in a single layer, the air fryer is hot, and you’ve used a little oil for coating.
- Chicken is Unevenly Cooked: This is almost always a result of not shaking the basket halfway through or overcrowding. Make sure all pieces have space and are tossed or flipped for even exposure to heat.
- Chicken is Sticking to the Basket: Ensure you used a light coating of oil before cooking. If using a recipe with very little oil, lightly spray the basket with cooking spray before adding the chicken.
Tips for Perfect Air Fryer Diced Chicken
Elevate your diced chicken game with these expert tips:
- Don’t Skip the Oil: Even a teaspoon or two of oil helps create that desirable crispy texture.
- Uniform Cuts are Crucial: Consistency in size leads to consistent cooking.
- Don’t Overcrowd: This is the golden rule of air frying. Cook in batches if necessary.
- Shake It Up: For perfectly even cooking, shaking the basket is essential.
- Experiment with Seasonings: Don’t be afraid to try new spice blends, herbs, or marinades.
- Consider Using Thighs: If you struggle with dry chicken, chicken thighs are more forgiving and stay incredibly moist.
- Use a Meat Thermometer: For guaranteed safety and perfectly cooked chicken every time, an instant-read thermometer is your best friend.
- Preheat for Crispiness: A hot air fryer is crucial for achieving that satisfying crunch.
Creative Ways to Use Your Air Fryer Diced Chicken
Once you’ve mastered the basic cooking technique, the possibilities are endless. Here are a few ideas:
- Salads: Add it to green salads, Caesar salads, or pasta salads for a protein boost.
- Tacos and Burritos: Toss with your favorite taco seasoning and serve in tortillas.
- Stir-fries: Add towards the end of your stir-fry to heat through.
- Pasta Dishes: Stir into alfredo, pesto, or marinara sauces.
- Wraps and Sandwiches: A delicious filling for any wrap or sandwich.
- Appetizers: Serve with a dipping sauce for a quick appetizer.
- Grain Bowls: Top your quinoa or rice bowls with this flavorful chicken.
Conclusion
Cooking diced chicken in the air fryer is a fantastic technique that delivers delicious, healthy, and incredibly convenient results. By following these simple steps, you’ll be able to create perfectly cooked, juicy, and crispy chicken pieces that can be used in countless dishes. Say goodbye to bland, dry chicken and hello to a new favorite weeknight staple. So, preheat your air fryer, grab your chicken, and get ready to impress yourself and your family with this easy and versatile cooking method!