Unlock the secret to perfectly crispy and juicy chicken wings using your Power Air Fryer. This comprehensive guide details everything from selecting the best wings and simple seasoning techniques to achieving that ideal cook time and temperature. Get ready for your go-to recipe for delicious, restaurant-quality chicken wings right at home!
Are you ready to elevate your appetizer game? Chicken wings are a crowd-pleaser, and cooking them in a Power Air Fryer is a game-changer. Forget soggy, greasy wings! Your air fryer can produce incredibly crispy, juicy chicken wings with minimal effort. This guide will walk you through every step, from picking the best wings to tossing them in your favorite sauce, ensuring you achieve restaurant-quality results in your own kitchen. We’ll cover everything you need to know to make perfect Power Air Fryer chicken wings every time.
Key Takeaways
- Choose the Right Wings: Opt for fresh, never-frozen chicken wings, specifically “party wings” (flats and drumettes), for the best crispiness.
- Dry is Key: Thoroughly patting your chicken wings dry is crucial for achieving a crispy exterior.
- Season Smartly: A light coating of oil and your favorite seasonings is all you need. Avoid overcrowding the basket.
- Perfect Temperature and Time: Generally, 380°F (190°C) for 20-25 minutes, flipping halfway, yields excellent results.
- Sauce Strategy: Toss cooked wings in sauce right before serving to maintain crispiness.
- Experiment and Enjoy: Don’t be afraid to try different rubs and sauces to find your personal favorites.
Why Cook Chicken Wings in a Power Air Fryer?
Power Air Fryers are designed to circulate hot air rapidly around your food. This process mimics deep-frying but uses significantly less oil, resulting in a healthier and equally delicious outcome. For chicken wings, this means an unbelievably crispy skin and tender, juicy meat inside. It’s a much faster and cleaner method than traditional oven-baking or deep-frying.
Choosing and Preparing Your Chicken Wings
The foundation of great chicken wings is the quality of the wings themselves. Let’s break down how to select and prepare them for air frying.
Selecting the Best Chicken Wings
- Fresh is Best: Always opt for fresh, never-frozen chicken wings. Frozen wings can contain excess moisture, which hinders crispiness.
- Type of Wings: Look for “party wings,” which are usually split into flats and drumettes. These are the most common and cook evenly. If you buy whole wings, you’ll need to separate them yourself at the joint.
- Size Matters: Uniformly sized wings will cook more evenly. Try to pick packs where the pieces are similar in size.
The Importance of Drying
This is perhaps the most critical step for achieving crispy skin. Moisture is the enemy of crispiness!
Step 1: Rinse and Pat Dry
Visual guide about How to Cook Chicken Wings in a Power Air Fryer
Image source: urbanblisslife.com
Rinse your chicken wings under cold water. Then, and this is very important, pat them completely dry with paper towels. Get into all the nooks and crannies. You can even let them air dry in the refrigerator for about 30 minutes on a rack set over a baking sheet, uncovered. This helps the skin dry out further.
Seasoning Your Chicken Wings
Keep it simple for the best results. The goal is to enhance the natural flavor of the chicken and create a base for crisping.
The Basic Seasoning Method
Step 2: Apply a Light Coating of Oil
In a large bowl, place your dried chicken wings. Drizzle them with a tablespoon or two of a high-heat cooking oil like avocado oil, canola oil, or vegetable oil. Toss the wings to ensure they are lightly coated. This oil helps the seasonings adhere and promotes browning and crisping.
Step 3: Add Your Seasonings
Now, sprinkle your chosen seasonings over the oiled wings. A good starting point is a mix of salt, black pepper, garlic powder, and paprika. For about 1.5 to 2 pounds of wings, try 1 teaspoon of salt, 1/2 teaspoon of black pepper, 1/2 teaspoon of garlic powder, and 1/2 teaspoon of paprika. Toss again to distribute the seasonings evenly. You can also use a pre-made wing rub.
Cooking Your Chicken Wings in the Power Air Fryer
This is where the magic happens! Follow these steps for perfectly cooked wings.
Preheating Your Air Fryer
Step 4: Preheat the Air Fryer
Visual guide about How to Cook Chicken Wings in a Power Air Fryer
Image source: skinnytaste.com
Preheating your Power Air Fryer is essential for ensuring the wings start cooking immediately and evenly. Most air fryers recommend preheating for about 3-5 minutes. For chicken wings, preheat your air fryer to 380°F (190°C).
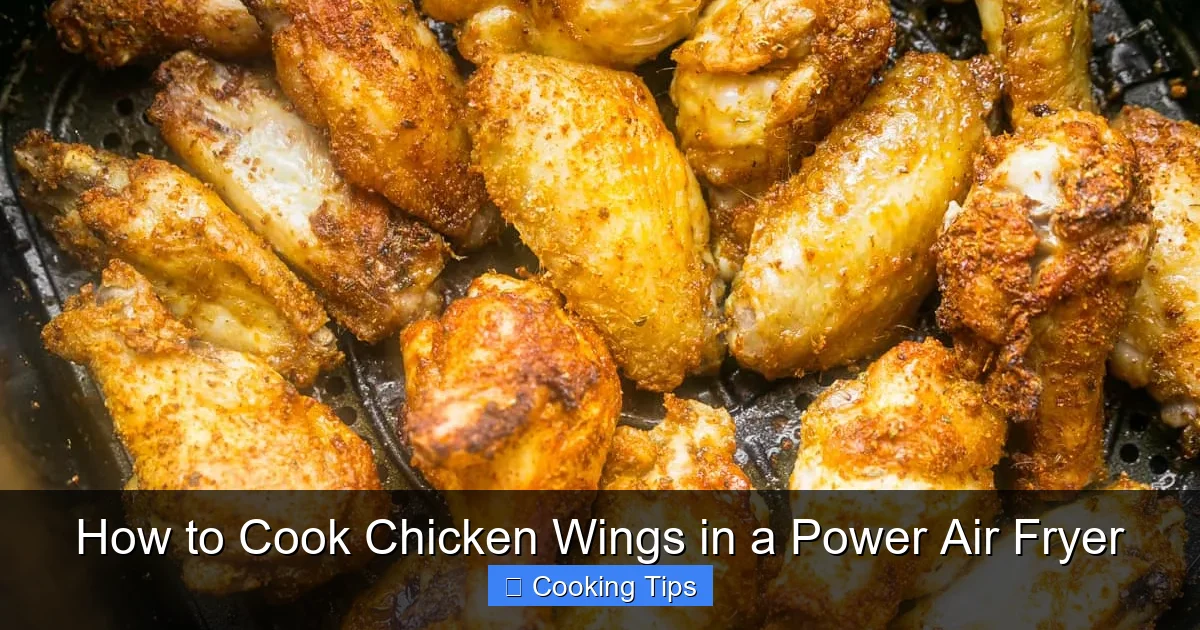
Arranging the Wings for Optimal Airflow
Step 5: Arrange Wings in a Single Layer
This is crucial for air circulation. Do not overcrowd the air fryer basket. If you have too many wings, cook them in batches. Overcrowding will lead to steaming rather than crisping, and you’ll end up with unevenly cooked, soggy wings. Arrange the seasoned wings in a single layer, ensuring there’s some space between each piece.
The Cooking Process
Step 6: Cook and Flip
Place the basket into the preheated air fryer. Cook for 10 minutes. After 10 minutes, open the air fryer and use tongs to flip each chicken wing. This ensures both sides get equally crispy. Continue cooking for another 10-15 minutes, or until the wings are golden brown and cooked through. The total cooking time will typically be between 20 to 25 minutes, depending on the size of your wings and your specific air fryer model.
Checking for Doneness
Step 7: Check Internal Temperature
The safest way to ensure your chicken wings are cooked is to check their internal temperature. Insert a meat thermometer into the thickest part of a wing, avoiding the bone. The internal temperature should reach at least 165°F (74°C). For extra crispiness and a more “fried” texture, some people prefer to cook them until they reach closer to 170-175°F (77-79°C).
Saucing and Serving Your Wings
The final touch! How you sauce your wings can make all the difference.
Timing is Everything for Sauces
Step 8: Toss with Sauce (Just Before Serving)
To keep your wings crispy, it’s best to toss them in sauce right before you’re ready to serve them. In a clean bowl, add your cooked wings and your favorite sauce. Toss gently until each wing is coated. If you’re serving multiple sauces, you can toss batches separately.
Popular Wing Sauce Ideas
- Classic Buffalo: Melted butter mixed with hot sauce (like Frank’s RedHot).
- BBQ: Your favorite store-bought or homemade BBQ sauce.
- Garlic Parmesan: Melted butter, minced garlic, grated Parmesan cheese, and a pinch of parsley.
- Honey Sriracha: Honey, sriracha, soy sauce, and a dash of lime juice.
- Lemon Pepper: Melted butter, lemon juice, and plenty of lemon pepper seasoning.
These are just starting points. The beauty of making chicken wings at home is the endless customization. If you’re curious about other popular appetizers, check out our guide on how to cook Tyson chicken nuggets in an air fryer, another great snack to make with this appliance.
Troubleshooting Common Air Fryer Wing Issues
Even with the best guide, you might encounter a few hiccups. Here’s how to fix them.
Soggy Wings
Cause: Not drying the wings enough, overcrowding the basket, or cooking at too low a temperature.
Solution: Ensure wings are thoroughly dry. Cook in a single layer, in batches if necessary. Increase the temperature slightly (by 5-10°F) for the last few minutes of cooking and ensure they aren’t sauced too early.
Unevenly Cooked Wings
Cause: Inconsistent wing sizes, overcrowding, or not flipping/shaking the basket.
Solution: Try to use wings of similar size. Always arrange in a single layer and flip them halfway through the cooking time. Shaking the basket can also help redistribute them.
Wings Not Crispy Enough
Cause: Insufficient cooking time, not enough oil, or excess moisture.
Solution: Increase the cooking time by a few minutes. Make sure you’re using a little oil. Re-check that the wings are as dry as possible before seasoning. For an even crispier result, consider a double cook: cook at 360°F (180°C) for 15 minutes, then increase to 400°F (200°C) for another 5-8 minutes.
Tips for Even Better Air Fryer Chicken Wings
Experiment with Rinsing: Some people swear by rinsing wings with baking powder. Mix about 1 tablespoon of baking powder with your seasonings and toss. The baking powder helps dry out the skin and makes it incredibly crispy. Just be sure to use regular baking powder, not baking soda, and rinse the wings thoroughly after coating them in baking powder, then pat them dry again.
Consider a Marinade: While simple seasonings work great, a short marinade can add another layer of flavor. However, for maximum crispiness, ensure you pat the marinated wings very dry before air frying. For marinated meats, you might want to consult our guide on how to cook a marinated pork tenderloin in an air fryer for general tips.
Use the Right Seasonings: Don’t be afraid to get creative with your rubs. Smoked paprika, chili powder, onion powder, and even a touch of brown sugar can add delicious depth.
Don’t Forget the Dip! Serve your hot, crispy wings with your favorite dipping sauces like ranch, blue cheese, or honey mustard.
If you’re a fan of crispy appetizers, you might also enjoy learning how to cook waffle fries in the air fryer to accompany your wings.
Conclusion
Cooking chicken wings in your Power Air Fryer is remarkably simple and yields fantastic results. By focusing on drying the wings thoroughly, seasoning them appropriately, avoiding overcrowding, and cooking them at the right temperature, you’ll be able to produce perfectly crispy and juicy chicken wings every time. Whether you’re making them for a game day party, a casual dinner, or just a snack, these air-fried wings are sure to be a hit. Enjoy experimenting with different flavors and sauces to find your ultimate wing creation! You’ve got this!