Discover how to cook delicious, crispy chicken in your air fryer oven with ease! This guide breaks down the process, from prepping your chicken to achieving perfect doneness. You’ll learn essential tips for seasoning, temperature, and timing, ensuring perfectly cooked chicken every single time. Get ready for healthier, faster, and tastier chicken meals!
How to Cook Chicken in an Air Fryer Oven
Welcome to your ultimate guide on cooking chicken in an air fryer oven! If you’ve been looking for a way to achieve that perfect balance of juicy tenderness and irresistible crispiness without the mess and extra oil of traditional frying, you’ve come to the right place. Air fryer ovens have revolutionized home cooking, offering a faster, healthier, and incredibly effective method for preparing all sorts of dishes, and chicken is no exception.
In this comprehensive guide, we’ll walk you through everything you need to know. From selecting the best chicken cuts and preparing them for the air fryer, to understanding cooking times and temperatures, and even troubleshooting common issues. Whether you’re a seasoned home cook or just starting, you’ll soon be confidently whipping up delicious air fryer chicken that will impress your family and friends.
We’ll cover:
- Choosing the right chicken
- Essential preparation steps
- Mastering temperature and time
- Achieving that perfect crisp
- Tips for different chicken cuts
- And much more!
Get ready to elevate your chicken game. Let’s dive in!
Key Takeaways
- Preheating is Crucial: Always preheat your air fryer oven to the desired temperature. This ensures even cooking and helps achieve that desirable crispy exterior.
- Season Generously: Don’t be shy with your seasonings! A good blend of herbs, spices, and a little oil will infuse flavor and promote browning.
- Avoid Overcrowding: Give your chicken pieces space. Overcrowding prevents hot air circulation, leading to uneven cooking and less crispy results.
- Use a Meat Thermometer: The most reliable way to ensure your chicken is safely cooked and perfectly done is by using a meat thermometer to check the internal temperature.
- Rest Your Chicken: Allowing your cooked chicken to rest for a few minutes before cutting into it helps to redistribute the juices, resulting in more tender and flavorful meat.
- Experiment with Cuts: This guide applies to various chicken cuts, from breasts and thighs to wings and drumsticks, though cooking times will vary.
[FEATURED_IMAGE_PLACEHOLDER]
Step 1: Choose Your Chicken
The first step to amazing air fryer chicken is selecting the right cut for your meal. Air fryer ovens are versatile and can handle almost any part of the chicken. Consider what you’re making and what texture you desire.
Popular Chicken Cuts for Air Frying:
- Boneless, Skinless Chicken Breasts: A lean and versatile option. They cook quickly and absorb marinades beautifully.
- Bone-In, Skin-On Chicken Breasts: These tend to be juicier due to the bone and the skin gets wonderfully crispy.
- Boneless, Skinless Chicken Thighs: Richer in flavor and more forgiving than breasts, they are less likely to dry out.
- Bone-In, Skin-On Chicken Thighs: These are a crowd-pleaser! The skin crisps up perfectly, and the dark meat stays moist and flavorful.
- Chicken Wings: Air fryers are arguably the best appliance for making crispy chicken wings at home.
- Chicken Drumsticks: Another favorite for their crispy skin and tender meat.
- Whole Chicken: Many air fryer ovens are large enough to roast a small whole chicken, delivering a beautifully browned and moist bird.
For beginners, boneless, skinless chicken breasts or thighs are a great starting point. If you’re aiming for that ultra-crispy skin, bone-in, skin-on cuts are your best bet. If you’re curious about cooking specific bone-in cuts, you might find our guides on how to cook bone-in chicken breast in an air fryer and how to cook bone-in chicken thighs in an air fryer helpful.
Step 2: Prepare Your Chicken
Proper preparation is key to delicious, well-cooked chicken. This involves ensuring the chicken is clean, dry, and seasoned to perfection.
Visual guide about How to Cook Chicken in an Air Fryer Oven
Image source: iheartumami.com
Sub-steps for Preparation:
2.1. Pat Dry the Chicken
This is a critical step, especially if you want crispy skin or a well-seared exterior. Use paper towels to pat each piece of chicken completely dry. Excess moisture will steam the chicken rather than allowing it to crisp up.
2.2. Trim Excess Fat
Remove any large pieces of excess fat from the chicken. A little bit of fat is good for flavor and moisture, but too much can cause excessive smoking in the air fryer.
2.3. Season Your Chicken
This is where you can get creative! You can use a simple salt and pepper blend, or go for more elaborate rubs and marinades. For a basic seasoning, start with:
- Salt
- Black pepper
- Garlic powder
- Onion powder
- Paprika (for color and a touch of sweetness)
For more flavor, consider adding:
- Dried herbs like thyme, rosemary, or oregano
- Spices like cumin, chili powder, or cayenne pepper for heat
- A drizzle of olive oil or other cooking oil. Oil helps the seasonings adhere and promotes browning and crispiness.
Tip: For boneless, skinless cuts, you can also marinate them for 30 minutes to a few hours in your favorite marinade. Just be mindful that marinades with a lot of sugar can burn easily in the air fryer, so adjust cooking time or temperature if needed.
2.4. Marinate (Optional)
If you choose to marinate, ensure you pat the chicken dry *after* marinating before seasoning and applying oil. This prevents sogginess. For shorter marinating times (like for boneless chicken), you can often get away with just a good rub.
Step 3: Preheat Your Air Fryer Oven
Just like with a conventional oven, preheating your air fryer oven is essential for consistent and even cooking. It ensures that the chicken hits the right temperature immediately, which helps in achieving a crispy exterior and prevents it from becoming rubbery.

Visual guide about How to Cook Chicken in an Air Fryer Oven
Image source: i.pinimg.com
How to Preheat:
- Set your air fryer oven to the desired cooking temperature. Common temperatures for chicken range from 375°F (190°C) to 400°F (200°C), depending on the cut and desired crispiness.
- Let the air fryer oven run for at least 3-5 minutes to heat up fully. Some models have a preheat indicator, while others you’ll just need to time it.
Step 4: Arrange Chicken in the Air Fryer Oven
Proper arrangement of the chicken in the air fryer basket or on the rack is crucial for allowing hot air to circulate effectively around each piece. This is what gives you that signature air-fried crispiness.
Visual guide about How to Cook Chicken in an Air Fryer Oven
Image source: recipethis.com
Arranging Tips:
- Single Layer: Always aim to cook the chicken in a single layer. Do not stack pieces on top of each other.
- Space Between Pieces: Leave some space between each chicken piece. This allows the hot air to flow freely, ensuring even cooking and browning. If you have too much chicken for one batch, it’s better to cook in multiple batches than to overcrowd.
- Placement: If your air fryer oven has a rack, place the chicken on the rack. If it has a basket, arrange it in the basket. Ensure the chicken is not touching the heating element directly if possible, though most units have guards for this.
Example: If you’re cooking 4 chicken breasts, place them on the rack or in the basket so that they are not touching. If they are very close, you’ll end up with some parts cooked and others pale and soft.
Step 5: Cook Your Chicken
Now for the magic! The cooking time will vary significantly depending on the size and type of chicken cut you are using. It’s always better to start with a slightly shorter time and add more if needed.
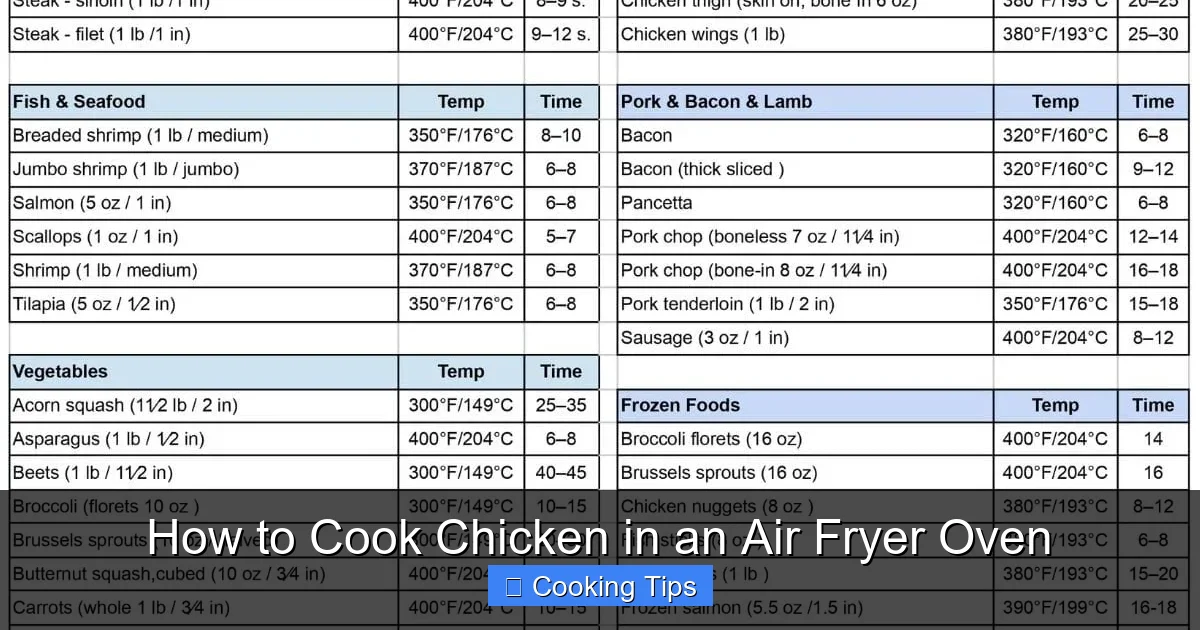
General Cooking Times and Temperatures:
These are general guidelines and may need adjustment based on your specific air fryer oven model and the size of your chicken pieces.
- Boneless, Skinless Chicken Breasts (approx. 6-8 oz): 375°F (190°C) for 18-25 minutes.
- Bone-In, Skin-On Chicken Breasts (approx. 8-10 oz): 400°F (200°C) for 25-35 minutes.
- Boneless, Skinless Chicken Thighs (approx. 4-6 oz): 375°F (190°C) for 15-20 minutes.
- Bone-In, Skin-On Chicken Thighs (approx. 6-8 oz): 400°F (200°C) for 20-28 minutes.
- Chicken Wings: 400°F (200°C) for 20-25 minutes, flipping halfway.
- Chicken Drumsticks: 400°F (200°C) for 18-24 minutes.
- Small Whole Chicken (approx. 3-4 lbs): 375°F (190°C) for 60-80 minutes.
Key Cooking Steps:
5.1. Set the Temperature and Time
Based on the guidelines above, set your air fryer oven to the appropriate temperature and initial cooking time.
5.2. Flip or Turn Chicken Halfway Through
For even cooking and browning, it’s important to flip or turn your chicken pieces halfway through the cooking time. This ensures all sides get exposed to the hot air.
5.3. Check for Doneness with a Meat Thermometer
This is the most important step for food safety and perfect results. Do not rely solely on cooking times. Insert a meat thermometer into the thickest part of the chicken, avoiding the bone. The chicken is safely cooked when it reaches an internal temperature of:
- 165°F (74°C) for boneless chicken breasts.
- 170-175°F (77-79°C) for bone-in chicken pieces and thighs.
- 165°F (74°C) for the breast meat of a whole chicken, and 170-175°F (77-79°C) for the thigh meat.
If the chicken hasn’t reached the desired temperature, continue cooking in 2-5 minute increments, checking the temperature each time.
Step 6: Rest Your Chicken
Once your chicken has reached the correct internal temperature, it’s tempting to cut into it immediately. However, for the juiciest and most tender results, resting the chicken is a crucial step.
Why Rest Your Chicken?
When chicken cooks, the muscle fibers tighten, pushing the juices towards the center. If you cut into it right away, these juices will run out onto the plate, leaving your chicken dry. Resting allows the juices to redistribute throughout the meat, resulting in a more succulent and flavorful bite.
How to Rest:
- Carefully remove the cooked chicken from the air fryer oven.
- Place it on a clean cutting board or plate.
- Tent it loosely with aluminum foil.
- Let it rest for 5-10 minutes for smaller cuts, or 10-15 minutes for larger pieces or a whole chicken.
Step 7: Serve and Enjoy!
After resting, your perfectly cooked air fryer chicken is ready to be served! Slice it, dice it, or serve it whole, depending on your meal. It’s fantastic on its own, in salads, sandwiches, or as part of a larger meal.
You can also use your air fryer oven for other delicious dishes, like a comforting pot pie (how to cook a pot pie in an air fryer) or even vegetables (how to make vegetables in an air fryer) to accompany your chicken.
Troubleshooting Common Air Fryer Chicken Issues
Even with the best guides, sometimes things don’t turn out perfectly. Here are a few common issues and how to fix them:
Problem: Chicken is Dry
Cause: Overcooked, not enough fat, or not rested.
Solution: Use a meat thermometer to avoid overcooking. Ensure you’re using cuts with adequate fat or consider marinades. Always rest your chicken!
Problem: Chicken is Not Crispy
Cause: Skin was not patted dry, overcrowded basket, or temperature too low.
Solution: Thoroughly pat chicken dry before cooking. Cook in a single layer with space between pieces. Ensure your air fryer is preheated to the correct temperature (often higher temps are needed for crisping).
Problem: Chicken is Unevenly Cooked
Cause: Overcrowding, pieces of different sizes, or not flipping.
Solution: Cook in batches if necessary. Cut chicken into uniform sizes. Always flip or turn halfway through cooking.
Problem: Smoking in the Air Fryer
Cause: Excess fat dripping onto the heating element, or high-smoke-point oils used at too low a temperature.
Solution: Trim excess fat. If using bone-in, skin-on chicken, you might place a slice of bread in the bottom of the air fryer basket to catch drippings (check your model’s manual for this recommendation). Ensure you’re using an oil with a suitable smoke point.
Conclusion
Cooking chicken in an air fryer oven is a fantastic way to achieve delicious, healthy, and quick meals. By following these steps, you’re well on your way to mastering this versatile cooking method. Remember to choose your chicken wisely, prepare it with care, preheat your oven, cook it to the perfect temperature using a thermometer, and always allow it to rest. With a little practice, you’ll be creating restaurant-quality air fryer chicken in your own kitchen!
Experiment with different seasonings, marinades, and cuts to discover your favorite ways to enjoy air fryer chicken. Happy cooking!