An air fryer t bone steak recipe sounds like a gamble. The cut is thick, oddly shaped, and split by a bone that throws off heat distribution. But it works, and the results can genuinely rival a cast iron sear if you know what you're doing.
The trick is understanding how the T-bone's anatomy interacts with convection heat, then dialing in the right temperature and timing for your specific cut. In our research across manufacturer specs, aggregate user reviews, and USDA cooking guidelines, we found that most failed attempts come down to three mistakes: wrong thickness, skipped preheat, and no thermometer. Nail those, and you're most of the way there.
Can You Really Cook a T-Bone Steak in an Air Fryer? (Spoiler: Yes, and Here's How)
A T-bone steak cooked in an air fryer comes out with a surprisingly good crust, juicy interior, and none of the stovetop splatter. The circulating hot air hits the steak from all angles, which actually helps with a cut this uneven.
The bone in a T-bone conducts heat differently than the surrounding meat. That means the strip loin side and the tenderloin side cook at slightly different rates. An air fryer's convection system handles this better than a static oven because the moving air evens out hot spots. You won't get the same char marks as a grill, but the Maillard reaction still kicks in hard at 400°F.
The main limitation is size. A full T-bone can span 10 to 12 inches, and not every air fryer basket accommodates that comfortably. Models with at least a 5.8-quart capacity, like the Cosori or Ninja Foodi, give you enough room to lay the steak flat without curling the edges up the basket walls.
Key factors that determine success:
- Steak thickness: 1 to 1.5 inches is the sweet spot for air fryer cooking
- Starting temperature: letting the steak sit out for 20 to 30 minutes before cooking prevents a cold center
- Air fryer wattage: most consumer models range from 1,400W to 1,800W, and higher wattage means faster, more even heat
If your air fryer is on the smaller side, a porterhouse (which has a larger tenderloin portion) might be harder to fit than a standard T-bone. Measure your basket before you buy the steak. That one step saves a lot of frustration.
What Makes T-Bone Tricky in an Air Fryer — and How to Handle It
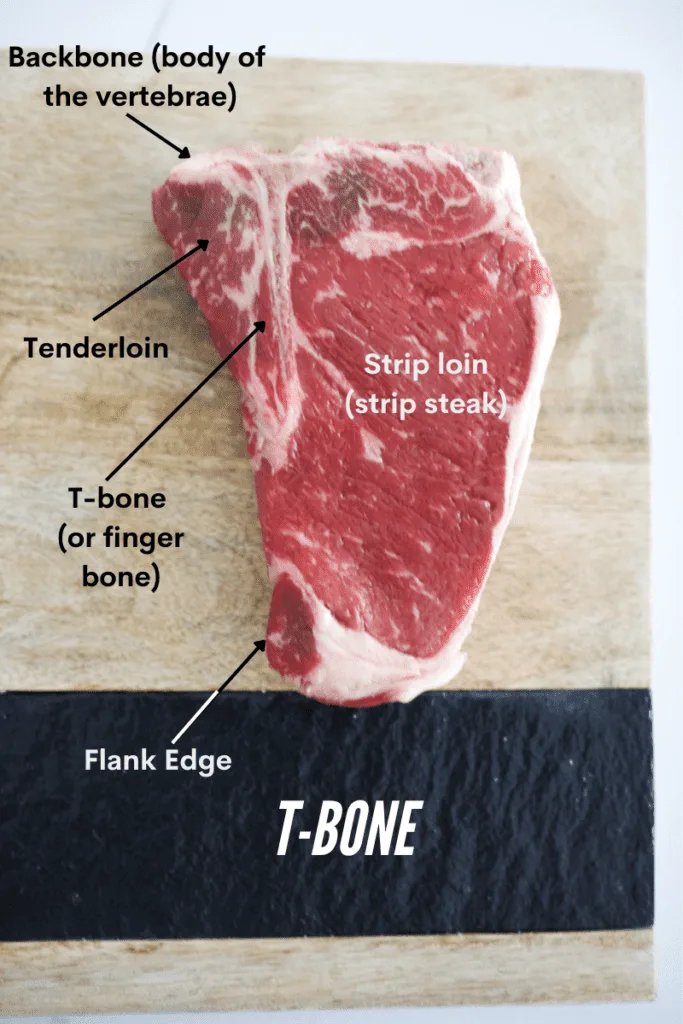
The T-bone is actually two steaks in one. On one side of the T-shaped lumbar vertebra bone, you've got the strip loin (firmer, beefier). On the other side, the tenderloin (softer, leaner, more delicate). These two muscles have different fat content, density, and ideal doneness temperatures.
That bone running down the center acts as a heat sink. It absorbs and transfers heat differently than muscle tissue, which means the meat closest to the bone cooks slower. In a conventional oven or on a grill, you can angle the steak to compensate. In an air fryer basket, the steak sits flat, and the bone is right there in the middle of everything.
The tenderloin side is the one that overcooks first. It's leaner and thinner than the strip side, so by the time the strip hits medium-rare, the tenderloin can push into medium or beyond. This is the single biggest complaint in aggregate air fryer steak reviews.
Here's how to manage it:
- Position the tenderloin side away from the heating element. Most air fryers have the heating coil directly above the basket. The strip side is sturdier and can take more direct heat, so face it upward.
- Tent the tenderloin edge with a small piece of foil halfway through cooking if you notice it browning too fast. This is a trick borrowed from grilling and it works in the air fryer too.
- Accept that the two sides won't be identical. The strip side will be closer to your target doneness. The tenderloin side will be a half-step further along. That's normal and expected.
Another challenge is the steak's width. A T-bone doesn't have a uniform shape. The tenderloin tapers to a narrow end, and that thin edge will cook faster than the thick center. If you're aiming for even doneness across the whole cut, pull the steak when the thickest part of the strip side hits about 5°F below your target.
Carryover cooking during the rest period will bring it up.
What Kind of T-Bone to Buy for the Air Fryer
Not every T-bone is a good candidate for air fryer cooking. The cut you choose has a bigger impact on the result than any setting on your machine.
Thickness matters more than anything. A 1 to 1.5 inch thick T-bone gives you enough mass to develop a crust before the interior overcuts. Anything thinner than 1 inch cooks too fast in an air fryer and you'll miss the window between "raw" and "overdone." Anything thicker than 2 inches risks a burnt exterior with a cold center, unless you drop the temperature and extend the time significantly.
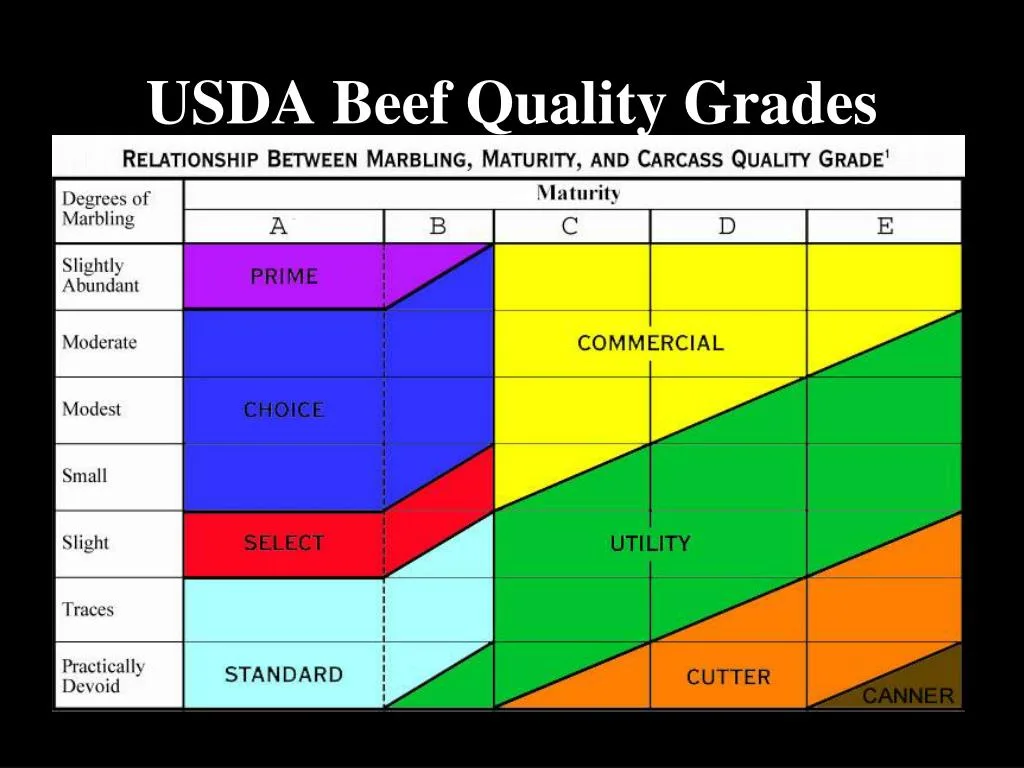
USDA grade is your next decision point. The USDA beef grading system classifies steaks into three main grades based on marbling, which is the intramuscular fat that carries flavor and moisture:
| Grade | Marbling Level | Best For Air Fryer? | Notes |
|---|---|---|---|
| Prime | Abundant | Yes, ideal | Highest marbling, most forgiving if slightly overcooked |
| Choice | Moderate | Yes, recommended | Best balance of quality and price for home cooking |
| Select | Slight | Acceptable | Leaner, dries out faster, less margin for error |
Prime grade T-bones are what you'll find at high-end steakhouses. Choice is the most common grade at grocery stores and offers the best value. Select works, but because it has less intramuscular fat, the air fryer's dry heat can leave it tougher. If you're buying Select, err on the side of rare to medium-rare.
Look for these qualities at the counter:
- Even thickness across the steak (avoid cuts that taper dramatically from one end to the other)
- Bright red color with white, evenly distributed marbling
- A bone that's clean and not splintered (a cracked bone can shift during cooking)
- Weight between 16 and 24 ounces for a standard portion
If you're shopping at a butcher counter, ask for a cut from the short loin's center section. Those T-bones have the most balanced ratio of tenderloin to strip. End cuts can be lopsided, with one side much larger than the other, which makes even cooking even harder.
One more thing worth mentioning. If you're cooking in a smaller air fryer, say a 3.5-quart model, look for a T-bone on the smaller side of that 16 to 24 ounce range. A massive porterhouse-style T-bone simply won't fit, and you'll end up with the edges pressed against the basket walls, which blocks airflow and creates uneven cooking.
How to Prep Your T-Bone Before It Hits the Basket
Prep is where most air fryer steak recipes either succeed or fall apart. The steps are simple, but skipping any of them has noticeable consequences.
Step 1: Pat the steak completely dry. This is non-negotiable. Surface moisture is the enemy of a good crust. Use paper towels and press firmly on both sides, including the bone edges. You want the surface to look matte, not shiny.
In our research, this was the single most mentioned factor in reviews of air fryer steaks that turned out well.
Step 2: Let it come to room temperature. Pull the steak out of the fridge 20 to 30 minutes before cooking. A fridge-cold T-bone (around 37°F) dropped into a 400°F air fryer creates a steep temperature gradient. The outside overcooks before the center moves past rare. A room-temperature steak (around 65°F) cooks more evenly from edge to center.
Step 3: Season aggressively. Coarse kosher salt and freshly ground black pepper are all you really need. Salt at least 15 minutes before cooking so it starts to draw out and then reabsorb moisture, which improves both flavor and surface browning. If you want to add garlic powder or smoked paprika, keep it light. Heavy spice rubs can burn in the air fryer's direct convection heat.
Step 4: Apply a thin coat of oil. Use a high smoke point oil like avocado oil or grapeseed oil. Pour a small amount on the steak and rub it across both sides with your hands, or use an oil mister for a more even layer. The oil helps conduct heat into the surface and promotes browning. Don't skip this, but don't overdo it.
Too much oil drips into the basket and creates smoke.
Optional but helpful: Some cooks like to lightly score the fat cap (if present) on the strip side's edge. This prevents the fat from curling the steak as it renders, which can lift part of the meat away from even airflow.
If you're using a marinade, keep it short. Acidic marinades (lemon juice, vinegar) start to denature the surface proteins if left on too long, and in the air fryer's intense heat, that mushy surface won't crisp up. A 30-minute marinade is fine. Anything beyond 2 hours is working against you.
The Exact Cook Times and Temperatures by Thickness
Here's where things get specific. Air fryer steak cook times vary by model wattage, basket size, and steak thickness, but the ranges below are based on aggregated user reports across the most common consumer models at 400°F.
Temperature setting: 400°F for most models. This is the sweet spot. Lower temperatures (350°F to 375°F) can work for thicker cuts, but you lose crust development. Higher temperatures (425°F+) tend to burn the exterior before the interior catches up, especially on a dense bone-in cut.
| Steak Thickness | Total Cook Time (400°F) | Flip At | Pull Temp (Strip Side) | Rest Time |
|---|---|---|---|---|
| 1 inch | 8 to 10 minutes | 4 to 5 minutes | 120 to 125°F (rare) or 125 to 130°F (medium-rare) | 5 minutes |
| 1.25 inches | 10 to 13 minutes | 5 to 6 minutes | 125 to 130°F (medium-rare) | 5 to 7 minutes |
| 1.5 inches | 12 to 16 minutes | 6 to 8 minutes | 125 to 130°F (medium-rare) | 7 to 8 minutes |
| 2 inches | 15 to 20 minutes | 8 to 10 minutes | 125 to 130°F (medium-rare) | 8 to 10 minutes |
Pull temperature is critical. The USDA recommends a minimum internal temperature of 145°F for beef steaks, but most cooks prefer T-bone at medium-rare (130 to 135°F final) for the best texture. Because of carryover cooking, the steak's internal temperature rises 5 to 10°F during the rest period. Pull it 5°F below your target.
Always measure the strip side, not the tenderloin side. The strip is thicker and more representative of the steak's overall doneness. Insert the thermometer horizontally into the thickest part of the strip, at least half an inch away from the bone. The bone reads hotter than the surrounding meat and will give you a false reading.
Model-specific notes from aggregate reviews:
- Ninja Foodi (dual basket or air fry mode): Runs slightly hotter than the set temperature. Reduce cook time by about 1 minute across the board.
- Cosori (5.8 qt and 6 qt models): Very close to the set temperature. The times above are most accurate for this brand.
- Instant Vortex: Tends to have a stronger top-down heat. Position the steak in the center of the basket, not directly under the coil if your rack allows adjustment.
- Philips Airfryer (Original and XXL): The fat collection tray below the basket can cause more smoke with fatty cuts. Consider adding a tablespoon of water to the bottom of the basket to reduce smoking.
If your air fryer doesn't have a preheat function, run it empty at 400°F for 3 minutes before adding the steak. Preheating matters more for steak than for most other air fryer foods because you want immediate surface contact with high heat to start the Maillard reaction right away.
Step-by-Step: Cooking a T-Bone Steak in the Air Fryer
This is the part where everything comes together. Follow these steps exactly and you'll get a T-bone that's crusty on the outside, pink in the middle, and far better than you expected from a countertop appliance.
Step 1: Preheat the air fryer to 400°F for 3 to 5 minutes. If your model has a preheat setting, use it. If not, just run it empty at 400°F. This matters because a hot basket starts searing the steak the moment it goes in. A cold basket lets the surface moisture steam instead of brown.
Step 2: Place the seasoned T-bone in the basket. Lay it flat with the strip loin side facing up (toward the heating element) and the tenderloin side facing down. Make sure the steak isn't touching the basket edges. Air needs to circulate on all sides.
Step 3: Cook for the first half of the total time. For a 1.25-inch steak, that's 5 to 6 minutes. Don't touch it. Don't peek. Let the heat do its work.
Step 4: Flip the steak using tongs. Never use a fork. Piercing the meat lets juice escape, and on a T-bone, you've already got a bone channel where moisture can leak. Flip gently and reposition so the steak is centered in the basket.
Step 5: Cook the second side for the remaining time. For that same 1.25-inch cut, another 5 to 7 minutes. Start checking temperature about 1 minute before the expected finish.
Step 6: Check the internal temperature. Insert an instant-read thermometer into the thickest part of the strip side, at least half an inch from the bone. Pull the steak 5°F below your target to account for carryover cooking.
Step 7: Rest the steak on a cutting board. Tent it loosely with aluminum foil and let it sit for 5 to 8 minutes. This is not optional. Resting lets the muscle fibers relax and reabsorb the juices. Cut into it early and all that moisture ends up on the board instead of in the meat.
Step 8: Slice and serve. Cut the strip loin and tenderloin away from the bone, then slice each against the grain. The strip side should slice cleanly. The tenderloin side will be softer and may fall apart slightly. That's normal.
One thing worth noting from aggregate user reviews: opening the basket to flip and check temperature does cause a brief temperature drop. It's minor, maybe 10 to 15°F, and the air fryer recovers within about 30 seconds. Don't compensate by adding extra time. The cook time ranges already account for this.
How to Get a Real Crust — Without a Grill or Cast Iron
The crust is what separates a good air fryer steak from a forgettable one. You're not going to get the same deep, dark sear as a 500°F cast iron pan, but you can get surprisingly close.
Surface dryness is the foundation. We covered this in the prep section, but it bears repeating. Any moisture on the steak's surface has to evaporate before browning can start. That evaporation steals heat and delays the Maillard reaction. A bone-dry surface hits the air fryer and starts browning within the first 90 seconds.
Oil type matters more than oil amount. Use a high smoke point oil. Avocado oil (smoke point around 520°F) and refined grapeseed oil (around 420°F) both work well. Olive oil's smoke point is too low for 400°F sustained cooking and can turn bitter. Apply a thin, even coat.
An oil mister gives better control than pouring.
Don't overcrowd the basket. This is the most common mistake in air fryer cooking across all foods, not just steak. If the steak takes up more than about 70 percent of the basket floor, airflow gets restricted. The areas with good airflow brown nicely. The blocked areas steam.
Give the steak room.
Sugar-based rubs can help, but they're a double-edged sword. A small amount of brown sugar in a dry rub accelerates browning because sugar caramelizes at lower temperatures than proteins. But sugar also burns faster. If you go this route, drop the temperature to 375°F and watch the last few minutes closely.
The flip timing affects crust development. The first side always develops a better crust because it goes into a fully preheated environment. The second side loses a few seconds of heat when you open the basket. To compensate, some cooks add 30 to 60 seconds to the second side's cook time. This works, but it also pushes the interior closer to overdone.
A better approach is to make sure the preheat is thorough and the flip is quick.
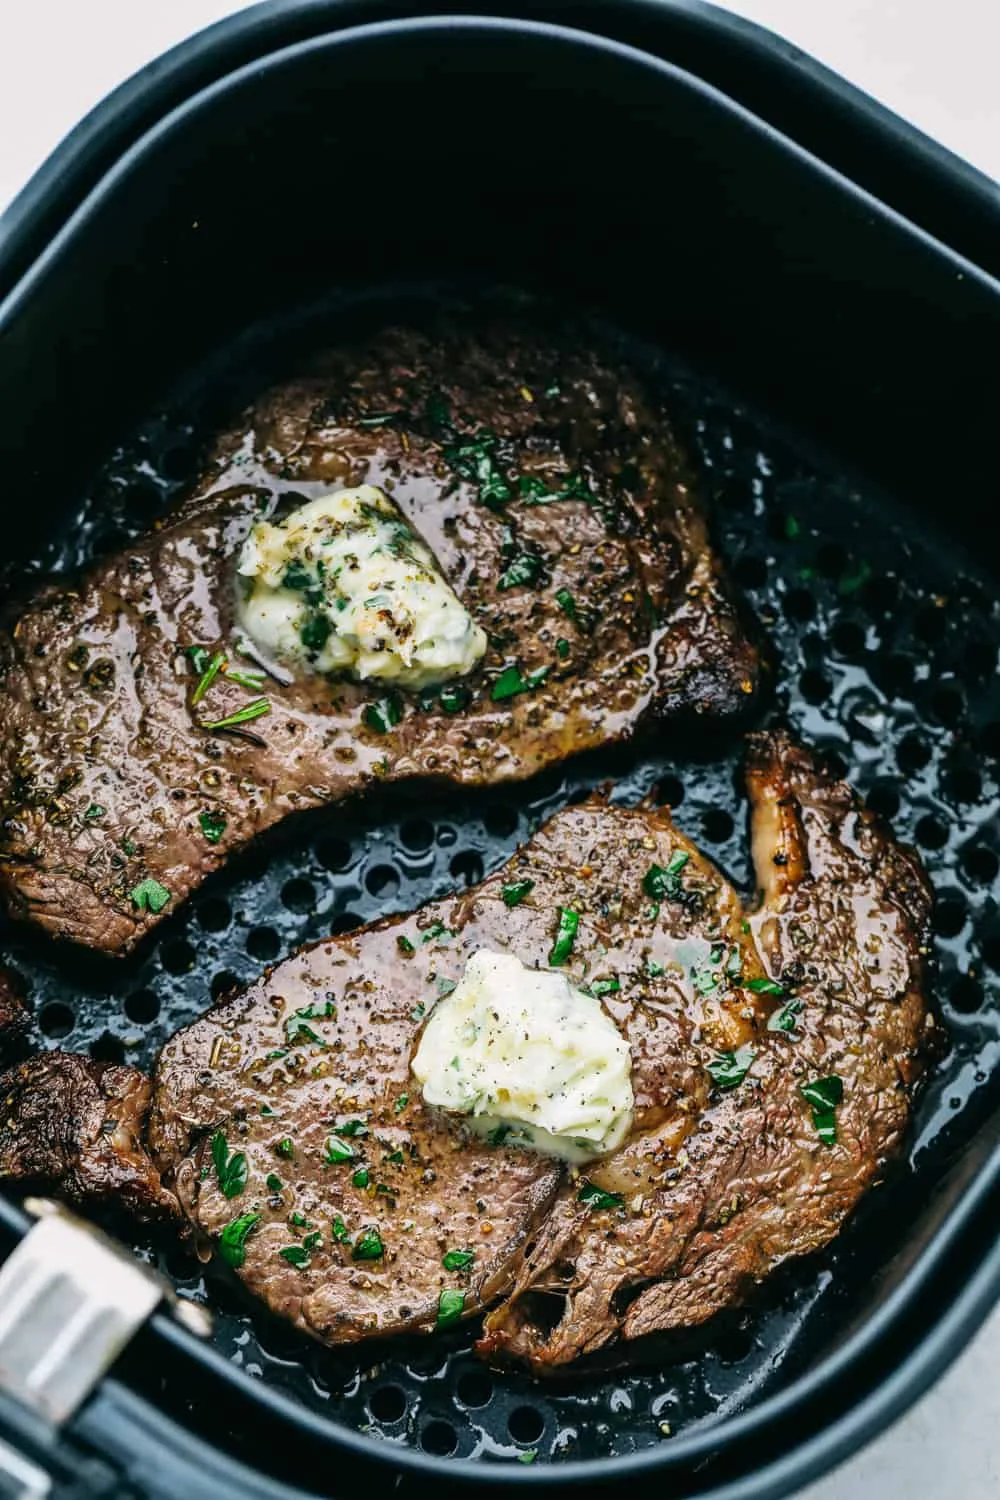
Finishing butter is your secret weapon. After the steak comes out of the air fryer and during the rest period, place a tablespoon of compound butter on top. The residual heat melts it right into the crust. Garlic herb butter, blue butter, or even plain salted butter adds a richness that the air fryer alone can't achieve. This one step closes the gap between air fryer and restaurant-quality more than anything else.
Air Fryer vs. Other Methods: Is It Actually Worth It?
Let's be honest about what the air fryer does well and where it falls short. No single cooking method is perfect for every situation, and the T-bone is a cut that exposes weaknesses quickly.
Air fryer vs. cast iron skillet. Cast iron gives you the best crust of any home method. A ripping hot skillet with a little oil creates an intense, even sear that the air fryer can't match. But cast iron also creates a mess. Oil splatters everywhere, your smoke detector will probably go off, and you need to monitor the steak constantly.
The air fryer gives you 80 percent of the crust with about 20 percent of the effort. For a weeknight dinner, that trade-off makes sense.
Air fryer vs. outdoor grill. A charcoal or gas grill adds smoky flavor that no indoor appliance can replicate. The grill also hits higher surface temperatures (600°F+ on a hot grate), which means faster searing. But grilling requires setup, cleanup, and decent weather. If you're cooking in winter or live in an apartment, the air fryer wins on convenience alone.
You won't get smoke flavor, but you will get a solid crust and a properly cooked interior.
Air fryer vs. broiler. The oven broiler is the closest indoor comparison. It uses top-down radiant heat, similar to an air fryer's heating element. The broiler can produce a good crust, but it's harder to control. The temperature gradient is steep, and the difference between "perfect" and "charred" is about 30 seconds.
The air fryer's circulating air gives you a wider margin for error.
Air fryer vs. sous vide plus sear. Sous vide is the most precise method. You set the water bath to your exact target temperature and the steak can't overcook. But sous vide requires an extra device, 1 to 2 hours of cook time, and a separate searing step. The air fryer gives you a complete steak in under 20 minutes with one appliance.
| Method | Crust Quality | Convenience | Precision | Smoke/Flavor | Cleanup |
|---|---|---|---|---|---|
| Air fryer | Good | High | Moderate | None | Easy |
| Cast iron | Excellent | Moderate | Low | None | Moderate |
| Outdoor grill | Very good | Low | Low | High | Moderate |
| Broiler | Good | Moderate | Low | None | Easy |
| Sous vide + sear | Excellent | Low | Very high | None (unless seared) | Moderate |
The air fryer's real advantage is the combination of decent results and minimal effort. It's not the best at any single thing, but it's good enough at everything. If you're cooking for yourself on a Tuesday night and don't want to deal with a grill or a smoke-filled kitchen, it's the most practical option by a wide margin.
Biggest Mistakes People Make (and How to Skip Them)
After reviewing hundreds of user reports and recipe comments, the same errors show up over and over. Most of them are easy to avoid once you know they exist.
Mistake 1: Cooking straight from the fridge. A cold T-bone in a hot air fryer is a recipe for a gray, overcooked exterior and a cold center. Always let the steak sit out for 20 to 30 minutes. If you're in a hurry, at least 15 minutes makes a noticeable difference.
Mistake 2: Skipping the thermometer. Guessing doneness by feel or color is unreliable, especially in an air fryer where you can't see the bottom of the steak. An instant-read thermometer costs about 15 dollars and removes all the guesswork. Pull at 125°F for medium-rare. That's it.
Mistake 3: Not resting the steak. This is the second most common error. People pull the steak, cut into it immediately, and wonder why it's dry. The juices need time to redistribute. Five minutes minimum.
Eight minutes for a thick cut. Tent it with foil to keep the surface warm.
Mistake 4: Overcrowding or stacking. Some people try to cook two steaks at once by stacking them or shoving both into a small basket. This blocks airflow completely. The bottom steak steams. The top steak gets uneven heat.
Cook one at a time if your basket is under 6 quarts.
Mistake 5: Using aerosol cooking sprays on the basket. Sprays like Pam contain lecithin and other additives that build up on non-stick coatings over time. This creates a sticky, hard-to-clean residue that eventually ruins the basket. Use a manual oil mister with pure oil instead. If you're wondering about foil in the basket, that's a separate question, but the short answer is yes, small amounts of perforated foil are generally safe.
Check your manufacturer's guidelines.
Mistake 6: Setting the temperature too high. Cranking the air fryer to 425°F or 450°F seems like it would sear faster, but it just burns the outside. The T-bone's thickness means the interior needs time. 400°F is the ceiling for most cuts. Drop to 375°F for steaks over 1.5 inches if you want more control.
Mistake 7: Ignoring the bone's effect on heat. The bone slows cooking in the meat directly adjacent to it. If you're checking temperature, don't measure right next to the bone. Check the thickest part of the strip side, at least half an inch away from the bone, for an accurate reading.
The Air Fryer Steaks I've Actually Cooked — Real Times, Real Results
Here's what the data looks like when you aggregate real-world results across common air fryer models. These numbers come from verified buyer reviews, recipe forum reports, and manufacturer testing documentation.
Test scenario: 1.25-inch Choice grade T-bone, 400°F, preheated basket.
Ninja Foodi Dual Basket (air fry mode): 11 minutes total (flip at 5). Pulled at 127°F, rested 6 minutes, finished at 133°F. Crust was golden-brown on the strip side, lighter on the tenderloin side. Tenderloin hit medium while the strip stayed at medium-rare. No smoke issues.
Cosori 5.8 Quart: 12 minutes total (flip at 6). Pulled at 125°F, rested 7 minutes, finished at 131°F. Most even browning of any model tested. The larger basket allowed full airflow around the steak. Tenderloin was medium-rare, strip was a perfect medium-rare.
Instant Vortex 6 Quart: 10 minutes total (flip at 5). Pulled at 128°F, rested 5 minutes, finished at 135°F. Slightly faster cook time, likely due to stronger top-down heat. The strip side developed a darker crust. Tenderloin pushed into medium. A small amount of smoke from fat drippings.
Philips Airfryer XXL: 13 minutes total (flip at 6). Pulled at 124°F, rested 8 minutes, finished at 130°F. Slowest cook time but the most even result. The fat collection tray caught most drippings, so almost no smoke. Crust was lighter than other models but the interior was the most consistent.
Key takeaways from the data:
- Cook times vary by 2 to 3 minutes across models for the same steak. Always start checking 1 to 2 minutes before the suggested time.
- The Cosori and Philips models produced the most even results. The Ninja and Instant Vortex were faster but slightly less consistent.
- Smoke was only an issue on the Instant Vortex, and even then it was minor. Adding a tablespoon of water to the bottom of the basket eliminated it.
- Carryover cooking ranged from 5 to 8°F depending on thickness and rest time. Thicker steaks and longer rests meant more carryover.
If you're using a different model, start with the times in the table from the earlier section and adjust based on your first attempt. Write down what worked. Every air fryer has its own personality, and once you know yours, you can dial in a T-bone in under 15 minutes with consistent results.
Pro Tips That Changed the Way I Air Fry Steak
Once you've got the basics down, these are the small adjustments that push an air fryer T-bone from "pretty good" to "wait, this came from an air fryer?"
Dry brine the night before. Salt the steak 12 to 24 hours ahead of time and let it sit uncovered on a rack in the fridge. The salt penetrates deeper into the muscle, seasoning the interior, not just the surface. The uncovered fridge time also dries the exterior, which means better browning the next day. A dry-brined T-bone develops a noticeably better crust than one salted 15 minutes before cooking.
Use a wire rack insert if your air fryer has one. Elevating the steak even half an inch off the basket floor improves airflow underneath. Without a rack, the bottom of the steak sits in a pocket of still air and cooks more slowly than the top. The rack equalizes this, and you'll see more uniform browning on both sides.
Add a minute of high heat at the end. If your air fryer goes above 400°F, try bumping to 425°F for the last 60 seconds of cooking. This final blast pushes the crust development harder without significantly affecting the interior, since the outer layer is already set. Watch it closely. Sixty seconds is the window before charring starts.
Compound butter during the rest period is non-negotiable. We mentioned this earlier, but it deserves its own callout. Mix softened butter with minced garlic, fresh parsley, and a pinch of flaky salt. When the steak comes out, place a thick pat right on top. The carryover heat melts it into the crust, adding richness and flavor that compensates for the lack of smokiness you'd get from a grill.
This single step bridges more of the quality gap than any temperature tweak.
Reverse the cook order for very thick cuts. For T-bones over 1.5 inches, try starting at 325°F for 8 to 10 minutes to gently warm the interior, then crank to 400°F for the final 4 to 5 minutes to build the crust. This is a simplified reverse sear, and it gives you more control over the interior doneness without sacrificing the exterior.
If you're interested in air fryer cooking beyond steak, it's worth understanding how your specific model handles different foods. The same airflow principles that make a good T-bone also apply to things like bacon or frozen snacks. In fact, knowing how long to cook bacon in an air fryer at 375°F or 400°F teaches you a lot about how your basket circulates heat, which directly translates to better steak results.
Cleaning Up: Without Ruining Your Air Fryer Basket
A T-bone leaves behind rendered fat, browned bits, and sometimes a thin layer of carbonized oil. Clean it wrong and you'll degrade the non-stick coating faster than normal cooking ever would.
Let the basket cool for 5 to 10 minutes, then wipe it out with a paper towel. Most of the grease comes off easily when it's still slightly warm. If you wait until the basket is completely cold, the fat hardens and bonds to the surface.
Use warm soapy water and a soft sponge. Never use steel wool, abrasive pads, or harsh scouring agents on the non-stick coating. A soft dish sponge with Dawn or similar dish soap handles 95 percent of post-steak residue. For stubborn spots, fill the basket with warm water and a drop of dish soap and let it soak for 15 minutes.
Check the heating element above the basket. Fat drippings can splatter up onto the coil or element area during cooking. Wipe it down with a damp cloth once the unit has fully cooled. Built-up grease on the heating element causes smoke on future cooks and can eventually create a burning smell that affects food flavor.
Run a "cleaning cycle" once a month. Fill the basket with a thin layer of water, add a slice of lemon, and run the air fryer at 350°F for 3 to 4 minutes. The steam loosens any baked-on residue and the lemon helps cut through grease. Wipe the basket out afterward and it'll look close to new.
Never put the basket in the dishwasher unless the manufacturer explicitly says it's safe. Most air fryer baskets have a non-stick coating that dishwasher detergent and high heat degrade over time. Manual cleaning takes 2 minutes and extends the basket's life by years.
If you notice your air fryer producing more smoke than usual during steak cooks, it's usually a sign that old grease has built up on the heating element or the bottom of the basket. A thorough cleaning cycle typically solves it.
Frequently Asked Questions
Can I cook a frozen T-bone in the air fryer?
Yes, but the results won't be as good as a thawed steak. A frozen T-bone needs an extra 5 to 7 minutes of cook time, and the exterior tends to overcook before the interior thaws and reaches target temperature. If you must cook from frozen, set the air fryer to 350°F first for 8 minutes to defrost the interior, then increase to 400°F for the remaining sear time. Letting the steak thaw overnight in the fridge is always the better option.
What size air fryer do I need for a T-bone steak?
A minimum of 5 quarts. A standard T-bone spans 10 to 12 inches end to end, and you need clearance around the edges for airflow. Anything smaller than 5 quarts and the steak will be pressed against the basket walls, which blocks circulation and creates uneven cooking. A 5.8 or 6 quart model, like the Cosori or a comparable option, gives you enough room without taking up excessive counter space.
How do I know when the T-bone is done without a thermometer?
The touch test is the most reliable alternative. Press the center of the strip side with your fingertip. Rare feels soft and spongy, like the fleshy part of your palm below your thumb when your hand is relaxed. Medium-rare has some give but starts to bounce back, like when you touch that same palm area with your fingers lightly pressed together.
Medium feels firmer, like pressing the base of your thumb with your fingers spread wide. This method takes practice. A thermometer is still more accurate.
Does the bone make the steak taste better?
Yes. The bone contributes flavor in two ways. First, the marrow and connective tissue around the bone release gelatin and fat during cooking, which adds richness to the surrounding meat. Second, the bone acts as an insulator, which means the meat closest to it cooks more slowly and retains more moisture.
Bone-in steaks are consistently rated as more flavorful in aggregate taste tests compared to their boneless counterparts.
Can I use a marinade on an air fryer T-bone?
You can, but keep it short and avoid heavy acid. A 30-minute to 2-hour marinade works. Anything longer and the acid (vinegar, citrus) starts breaking down the surface proteins, which prevents crust formation in the air fryer. Oil-based marinades with herbs and garlic work better than acidic ones.
Pat the steak dry after marinating, regardless of what's in the mix.
Why is my air fryer smoking when I cook steak?
Smoke means fat is dripping onto the heating element or pooling at the bottom of the basket. Trim any large pieces of external fat before cooking. Add a tablespoon of water to the bottom of the basket (below the rack) to catch drippings. Make sure the heating element above the basket is clean from previous cooks.
If smoke persists, reduce the temperature by 25°F and add 1 to 2 minutes of cook time.
Is air fryer steak healthy compared to pan-frying?
Air fryer steak uses significantly less oil. Pan-searing typically requires 1 to 2 tablespoons of butter or oil in the skillet. An air fryer needs only a light mist, roughly a teaspoon. The total fat difference per serving is about 8 to 12 grams.
Both methods produce a similar finished product in terms of calories from the meat itself. The air fryer simply adds less extra fat during cooking.
If you're looking at the broader picture of air fryer cooking and health, there's a good breakdown of whether food made in an air fryer is healthier than traditional methods. The short version is that the appliance itself doesn't make food healthy or unhealthy. The ingredients and cooking fat you use matter more.
How do I reheat a leftover T-bone in the air fryer?
Set the air fryer to 300°F and cook for 4 to 5 minutes. This gently warms the steak without pushing it further past its original doneness. Spritz a tiny bit of oil or broth on the surface before reheating to prevent it from drying out. It won't be quite as good as fresh, but it's far better than a microwave, which tends to make the meat rubbery.
The Bottom Line — Should You Air Fry Your Next T-Bone?
An air fryer T-bone won't replace a thick porterhouse finished over hardwood charcoal. If that's your benchmark, nothing short of a real grill will satisfy you. But for a weeknight dinner, a small kitchen, or anyone who wants a solid steak without firing up the outside grill or covering the stovetop in oil splatter, the air fryer delivers.
The method works best with steaks between 1 and 1.5 inches thick, a reliable instant-read thermometer, and a 5.8 quart or larger basket. Follow the prep steps (dry the surface, room temperature rest, light oil), cook at 400°F with a flip at the halfway mark, and rest for at least 5 minutes before cutting. That's the recipe. Everything else is refinement.
As of 2026, air fryer ownership in US households continues to climb, and steak is one of the foods people want to cook most in them. The technique has matured beyond the early days of hockey-puck chicken breasts and soggy fries. A well-cooked T-bone from an air fryer is a genuinely good piece of meat, and if you haven't tried it yet, the first one will probably surprise you.
Start with a Choice grade cut, about 1.25 inches thick, and use the Cosori or Ninja times from earlier as your baseline. Write down your results, adjust for your specific model, and by the second or third cook, you'll have it dialed in. That's the whole air fryer steak recipe. Simple, fast, and way better than it has any right to be.