Discover the secret to perfectly cooked Chicken Kiev using your air fryer. This comprehensive guide will walk you through every step, from preparing the chicken to achieving a golden, crispy exterior and a tender, juicy interior. Get ready to impress your family and friends with restaurant-quality Chicken Kiev, made effortlessly in your own kitchen.
Key Takeaways
- Effortless Preparation: This guide breaks down the process of making Chicken Kiev for the air fryer into simple, manageable steps.
- Crispy Perfection: Learn the techniques to achieve a beautifully golden and crispy coating on your Chicken Kiev every time.
- Juicy Interior: Discover how to keep the chicken moist and tender while ensuring the butter filling stays perfectly melted.
- Time-Saving Method: Utilizing the air fryer significantly reduces cooking time compared to traditional methods.
- Troubleshooting Tips: Address common issues like undercooked chicken or leaking butter for a flawless result.
- Customizable Flavor: Explore options for seasoning the chicken and the butter filling to suit your taste preferences.
How to Cook Chicken Kiev in Air Fryer
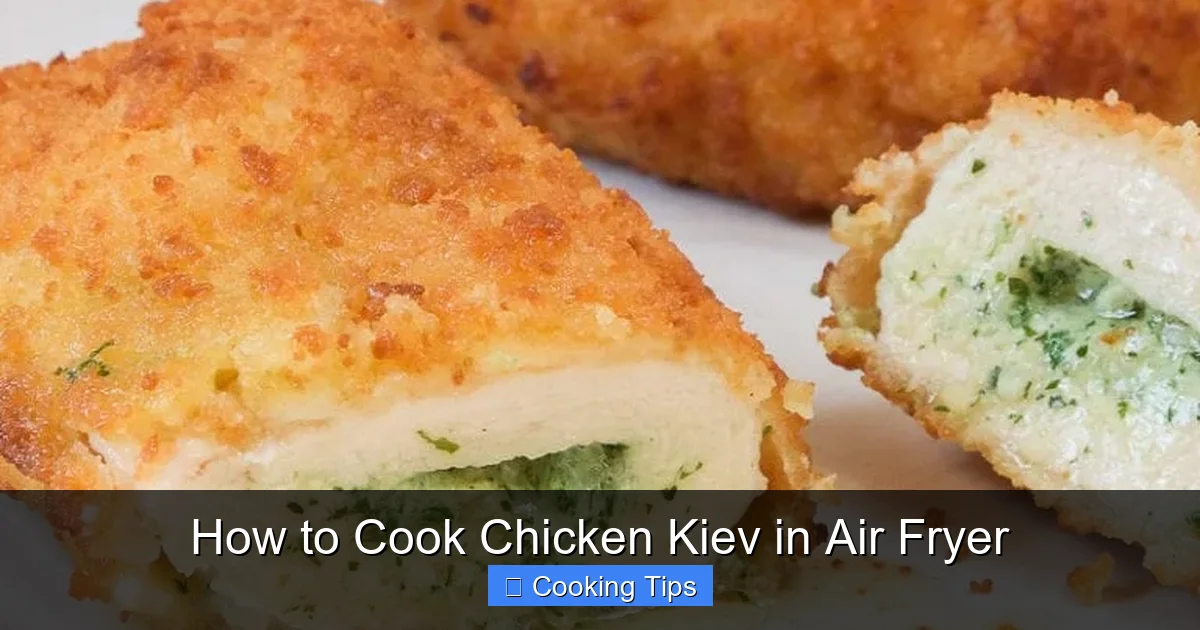
Chicken Kiev. The name itself conjures images of elegant dining, a culinary masterpiece with a golden, crunchy exterior giving way to a tender chicken breast, and a molten core of herbed butter. Traditionally, this dish involves a bit of fuss, from pounding the chicken breast thin to carefully rolling and breading it, followed by deep frying or baking. But what if we told you that you could achieve that same deliciousness, that same satisfying crunch, and that same rich, buttery center with the magic of your air fryer?
Yes, it’s true! The air fryer is a game-changer for recreating classic dishes, and Chicken Kiev is no exception. It delivers that sought-after crispiness without the grease of deep frying, and it’s much faster than traditional oven baking. In this comprehensive guide, we’ll walk you through everything you need to know to cook perfect Chicken Kiev in your air fryer. Get ready to enjoy a restaurant-quality meal in the comfort of your own home, with less mess and less time. We’ll cover preparation, cooking techniques, and even some handy tips to ensure your Chicken Kiev is a resounding success.
What You’ll Need: Ingredients and Equipment
Before we dive into the cooking process, let’s gather our supplies. Having everything ready will make the entire experience much smoother.
Ingredients
- Chicken Breasts: Two boneless, skinless chicken breasts, about 6-8 ounces each. Look for breasts that are relatively uniform in thickness.
- Butter: 4 tablespoons of unsalted butter, softened. This is for the delicious, molten center.
- Herbs: 1-2 tablespoons of fresh, finely chopped herbs. Parsley is classic, but chives, dill, or a mix work wonderfully.
- Garlic: 1 clove of garlic, minced (optional, but highly recommended).
- Lemon Zest: 1/2 teaspoon of lemon zest (optional, for a bright flavor boost).
- Salt: To taste.
- Black Pepper: Freshly ground, to taste.
- All-Purpose Flour: About 1/2 cup, for dredging.
- Eggs: 2 large eggs, lightly beaten.
- Breadcrumbs: 1 cup of Panko breadcrumbs for ultimate crispiness. Regular breadcrumbs will also work.
Equipment
- Air Fryer: Of course!
- Plastic Wrap: For pounding the chicken.
- Meat Mallet or Rolling Pin: To flatten the chicken breasts.
- Small Bowl: For mixing the butter filling.
- Three Shallow Dishes or Plates: For the flour, egg wash, and breadcrumbs.
- Tongs: For handling the chicken.
- Toothpicks or Kitchen Twine: To secure the chicken rolls (optional but helpful).
- Instant-Read Thermometer: Crucial for checking internal temperature.
Step-by-Step Guide to Air Fryer Chicken Kiev
Now, let’s get cooking! Follow these simple steps to create your delicious Chicken Kiev.
Step 1: Prepare the Herbed Butter
This is where the magic begins!
1.1. Soften the Butter: Ensure your butter is softened but not melted. You can leave it at room temperature for about an hour, or gently warm it in the microwave for a few seconds.

Visual guide about How to Cook Chicken Kiev in Air Fryer
Image source: cdn.thefreshmancook.com

Visual guide about How to Cook Chicken Kiev in Air Fryer
Image source: thefreshmancook.com
1.2. Mix the Filling: In a small bowl, combine the softened butter with your finely chopped herbs, minced garlic (if using), lemon zest (if using), salt, and pepper. Mix thoroughly until everything is well incorporated.
1.3. Shape the Butter: Divide the butter mixture in half and shape each half into a small log or cylinder. You can do this by placing the butter on a piece of plastic wrap, folding the wrap around it to form a log, and then twisting the ends. Chill these butter logs in the freezer for about 15-20 minutes, or in the refrigerator for about 30-40 minutes. This makes them easier to handle and less likely to melt out too quickly during cooking.
Step 2: Prepare the Chicken Breasts
We need to create a thin, even canvas for our delicious filling.
2.1. Butterfly or Slice: If your chicken breasts are very thick, you might need to butterfly them. Slice horizontally almost all the way through, leaving one side attached, then open them up like a book. If they are already relatively flat, you might skip this.
2.2. Pound the Chicken: Place one chicken breast between two sheets of plastic wrap. Using a meat mallet or a rolling pin, gently pound the chicken to an even thickness of about 1/4 inch. Be firm but don’t tear the meat. Repeat with the second chicken breast.
2.3. Season the Chicken: Lightly season both sides of the pounded chicken breasts with salt and pepper.
Step 3: Fill and Roll the Chicken
This step requires a little bit of technique to ensure the butter stays inside.
3.1. Place the Butter: Take one of your chilled butter logs and place it at one end of a pounded chicken breast. Position it near the edge that will be rolled first.
3.2. Roll Tightly: Carefully fold the chicken breast over the butter log, tucking in the sides as you go. Roll it up tightly, like you would a jelly roll, ensuring the butter is completely enclosed. The goal is to create a sealed package.
3.3. Secure if Necessary: If you’re concerned about the roll coming undone, you can secure it with toothpicks or tie it with kitchen twine. This is especially helpful if your chicken didn’t naturally seal well.
3.4. Repeat: Repeat the filling and rolling process with the second chicken breast and the remaining butter log.
Step 4: Breading the Chicken
This is what will give us that irresistible crispy coating.
4.1. Set Up Breading Stations: Prepare three shallow dishes:
- Dish 1: All-purpose flour seasoned with a pinch of salt and pepper.
- Dish 2: Beaten eggs.
- Dish 3: Panko breadcrumbs, seasoned with a little salt and pepper.
4.2. Dredge in Flour: Take one rolled chicken breast and coat it thoroughly in the seasoned flour, shaking off any excess.
4.3. Dip in Egg: Next, dip the floured chicken into the beaten eggs, ensuring it’s fully coated. Let any excess egg drip off.
4.4. Coat in Breadcrumbs: Finally, roll the chicken in the Panko breadcrumbs, pressing gently to help them adhere. Make sure the entire surface is covered. Repeat for the second chicken breast.
4.5. Chill Again (Optional but Recommended): For an even crispier coating and to further help the breading adhere, you can place the breaded chicken breasts in the refrigerator for about 15-20 minutes. This is a good time to preheat your air fryer.
Step 5: Air Frying the Chicken Kiev
The moment of truth!
5.1. Preheat the Air Fryer: Preheat your air fryer to 380°F (190°C) for about 3-5 minutes. This ensures even cooking and a crispier exterior right from the start.
5.2. Arrange in the Basket: Carefully place the breaded chicken breasts in the air fryer basket in a single layer. Do not overcrowd the basket, as this can lead to uneven cooking and a less crispy result. If you’re cooking more than two, you’ll likely need to cook them in batches. If you’re looking for tips on cooking multiple items, check out our guide on how to cook anytizers in an air fryer, which emphasizes proper spacing.
5.3. Cook Time: Air fry for 18-22 minutes. The exact time will depend on the thickness of your chicken and your specific air fryer model.
5.4. Flip Midway: Halfway through the cooking time (around the 10-minute mark), carefully flip the chicken breasts using tongs. This ensures both sides get evenly golden brown and crispy.
5.5. Check for Doneness: The chicken is done when the breading is golden brown and crispy, and the internal temperature reaches 165°F (74°C) when an instant-read thermometer is inserted into the thickest part of the chicken, avoiding the butter filling. If the breading is browning too quickly, you can lower the air fryer temperature slightly for the last few minutes.
Step 6: Rest and Serve
Patience is key for the perfect Chicken Kiev.
6.1. Let It Rest: Once cooked, carefully remove the Chicken Kiev from the air fryer basket. Place it on a plate or cutting board and let it rest for 5-10 minutes. This allows the juices to redistribute, ensuring a moist and tender chicken breast, and also gives the molten butter filling a moment to settle slightly so it doesn’t all gush out at once when you cut into it.
6.2. Serve: Serve your delicious Air Fryer Chicken Kiev hot. You can cut into it to reveal the melty, herbed butter inside, or serve it whole.
Tips for Success and Variations
Visual guide about How to Cook Chicken Kiev in Air Fryer
Image source: simplyairfryer.com
Here are some extra tips and ideas to make your Chicken Kiev even better.
- Don’t Skip the Chilling Step: Chilling the butter logs and the breaded chicken helps ensure the butter doesn’t leak out during cooking and that the breading adheres well.
- Achieve Extra Crispiness: For an even crispier coating, consider double-dipping the chicken in egg and breadcrumbs. After the first breading, dip it back into the egg and then into the breadcrumbs again.
- Butter Flavor Variations: Experiment with different herbs and spices in your butter filling. A pinch of smoked paprika, a dash of cayenne pepper for a little heat, or even some finely grated Parmesan cheese can add a new dimension of flavor.
- Ensure Even Pounding: Uniform thickness is critical for even cooking. If one part of the chicken is much thicker than another, it will cook at a different rate, potentially leading to overcooked edges and undercooked centers.
- Preheating is Important: Just like with cooking wings or fries, preheating your air fryer is crucial for achieving that signature crispy texture. For more tips on getting crispy results with chicken, you might find our guide on how to cook boneless chicken wings in an air fryer helpful, as it emphasizes crispiness techniques.
- Internal Temperature is Key: Always use an instant-read thermometer to ensure your chicken is cooked to a safe internal temperature of 165°F (74°C). Overcooking will dry out the chicken, while undercooking is a food safety risk. For other chicken breast cooking, like bone-in breasts, always check the internal temperature; see our guide on how to cook bone-in chicken breast in an air fryer for similar temperature guidelines.
Troubleshooting Common Issues
Even with the best intentions, sometimes things don’t go perfectly. Here are solutions to common problems:
- Butter Leaking Out: This is the most common issue. Ensure your butter logs are well-chilled and firm. Roll the chicken tightly and tuck in the sides. If a small amount leaks, it’s not the end of the world, but a lot of leakage means you’ll miss out on that delicious molten center.
- Breading Falling Off: Make sure you’re pressing the breadcrumbs firmly onto the chicken. The double-dipping technique can also help the breading stick better. Ensure you’re not moving the chicken too much before or during cooking.
- Undercooked Chicken: If your chicken isn’t cooked through, return it to the air fryer for a few more minutes. Make sure your thermometer is inserted into the thickest part of the meat, not the butter.
- Breading Burning: If the breading is getting too dark before the chicken is cooked, you can loosely tent the chicken with aluminum foil for the remaining cooking time. Lowering the temperature slightly can also help.
Serving Suggestions
Chicken Kiev is a fairly rich dish, so it pairs well with lighter sides.
- Mashed Potatoes: A classic pairing that soaks up any extra butter.
- Steamed or Roasted Vegetables: Broccoli, asparagus, green beans, or a simple mixed vegetable medley provide a nice contrast. You can even air fry your vegetables! For inspiration, check out how to make veg in an air fryer.
- Green Salad: A fresh, crisp salad with a light vinaigrette balances the richness of the chicken.
- Rice Pilaf: A simple and elegant side dish.
Conclusion
Cooking Chicken Kiev in the air fryer is a revelation. It’s an achievable, delicious way to enjoy this classic dish without the traditional hassle and mess. You get that satisfying crunch, that tender chicken, and that glorious burst of herbed butter, all with the convenience and speed of your air fryer. By following these steps, paying attention to the details of preparation and cooking, and using a reliable thermometer, you’re well on your way to mastering Air Fryer Chicken Kiev. So go ahead, give it a try, and prepare to be impressed by how simple and rewarding homemade Chicken Kiev can be!