Cooking chicken breast in your Ninja air fryer is simple and fast. This guide provides clear, step-by-step instructions to achieve perfectly juicy and tender chicken every time. You’ll learn about preparation, cooking times, and essential tips for delicious results.
How to Cook Chicken Breast in Air Fryer Ninja
Are you tired of dry, bland chicken breast? Do you want a quick, healthy, and delicious way to prepare this versatile protein? Look no further! Your Ninja air fryer is the perfect tool to achieve incredibly juicy and flavorful chicken breast with minimal effort. Forget about hovering over a hot stove or oven; the air fryer does the hard work for you, delivering restaurant-quality results right in your kitchen.
This comprehensive guide will walk you through every step of cooking chicken breast in your Ninja air fryer. We’ll cover everything from selecting the right chicken and preparing it for the air fryer to achieving that perfect golden-brown finish. Whether you’re a seasoned air fryer pro or a complete beginner, you’ll be cooking perfect chicken breast in no time. Let’s get started on your journey to air-fried chicken perfection!
Key Takeaways
- Perfectly Cooked Chicken Breast: Learn the exact temperature and time needed to cook chicken breast to a safe internal temperature of 165°F (74°C), ensuring it’s juicy and fully cooked.
- Simple Preparation Steps: This guide breaks down how to prepare your chicken breast, from patting it dry to seasoning, for optimal flavor and texture.
- Leveraging Your Ninja Air Fryer: Understand how to use your specific Ninja air fryer model, including preheating and basket placement, for best results.
- Achieving a Golden-Brown Finish: Discover techniques to get that desirable crispy exterior while keeping the inside moist.
- Troubleshooting Common Issues: Find solutions for common problems like dry chicken or uneven cooking.
- Versatile Meal Prep: Cooked chicken breast from the air fryer is incredibly versatile, perfect for salads, sandwiches, or main courses.
Why Use Your Ninja Air Fryer for Chicken Breast?
Before we dive into the “how,” let’s talk about “why.” Air fryers, especially robust models like those from Ninja, are game-changers for cooking. They circulate hot air rapidly around your food, creating a crispy exterior while keeping the inside moist and tender. This means:
- Speed: Chicken breast cooks much faster in an air fryer than in a traditional oven.
- Healthier: You use little to no oil, making it a healthier alternative to deep frying.
- Consistency: Air fryers provide even cooking, reducing the chances of undercooked or overcooked spots.
- Flavor: The hot air circulation enhances the natural flavors of the chicken and helps seasonings adhere beautifully.
- Juiciness: When cooked correctly, the rapid cooking process seals in moisture, resulting in incredibly juicy chicken.
This method is ideal for meal prep, quick weeknight dinners, or even when you just need a protein boost for a salad. If you’re looking for other quick protein options, you might find our guide on how to cook bacon in my Ninja air fryer helpful.
Preparing Your Chicken Breast

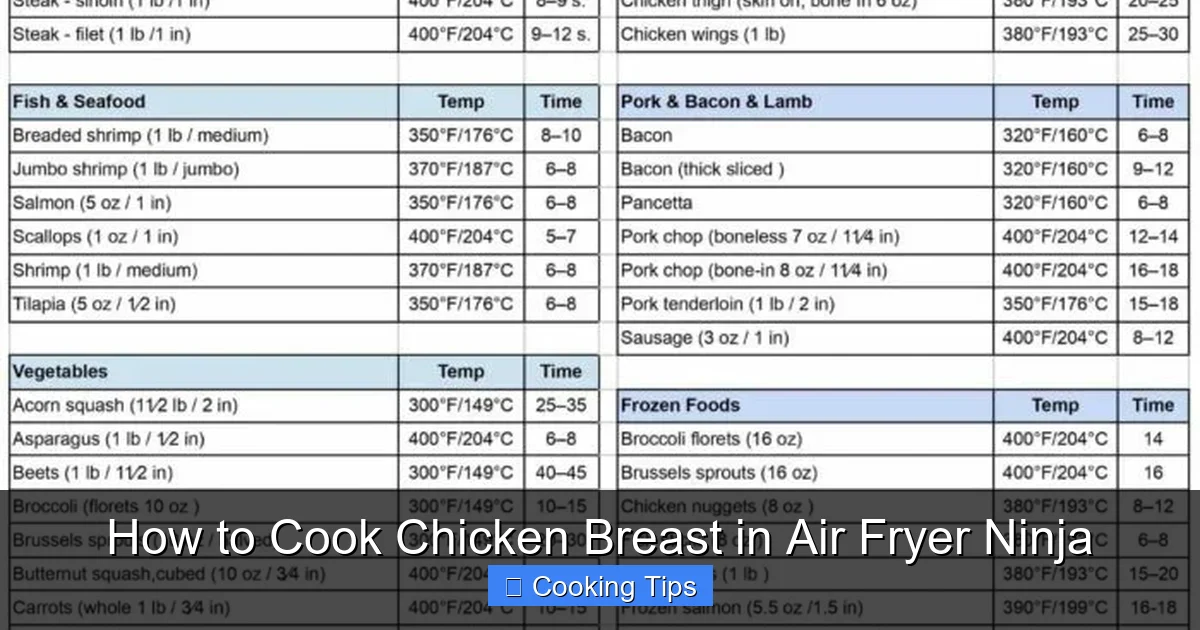
Visual guide about How to Cook Chicken Breast in Air Fryer Ninja
Image source: storables.com
The foundation of any great dish is proper preparation. Here’s how to get your chicken breast ready for its air-frying adventure.
Choosing the Right Chicken Breast
For the best results, opt for boneless, skinless chicken breasts. They are the most common and easiest to work with in an air fryer. Try to select chicken breasts that are of similar thickness. This ensures they cook evenly. If you have very thick breasts, you might need to pound them slightly to achieve a more uniform thickness, or cook them in batches.
Thawing If Frozen
If your chicken breast is frozen, it’s crucial to thaw it completely before air frying. Cooking frozen chicken breast can lead to uneven cooking, with the outside getting overcooked while the inside remains raw. The safest way to thaw chicken is in the refrigerator overnight. For faster thawing, you can use the defrost setting on your microwave, but ensure it’s fully thawed before proceeding to the air fryer.
Patting Dry for Crispy Skin (or Exterior)
This is a critical step often overlooked. Use paper towels to pat your chicken breasts thoroughly dry. Moisture is the enemy of crispiness. Removing excess moisture allows the air fryer to crisp up the exterior of the chicken, giving it a lovely golden-brown color and a more appealing texture.
Seasoning for Maximum Flavor
This is where you can get creative! Simple salt and pepper are a great starting point. You can also use a variety of rubs and marinades.
* Simple Seasoning: Olive oil (or your preferred cooking oil), salt, black pepper, garlic powder, onion powder, and paprika are a classic combination.
* Marinades: For an extra layer of flavor, marinate your chicken breasts for at least 30 minutes (or up to a few hours) in the refrigerator. Popular marinades include Italian dressing, lemon herb, soy sauce-based, or even a BBQ marinade. Just remember to pat them dry after marinating if you want a crispier exterior.
* Brining: For guaranteed juiciness, consider a quick brine. Dissolve 1 tablespoon of salt and 1 tablespoon of sugar in 2 cups of water, submerge the chicken breasts for 15-30 minutes, then rinse and pat dry.
Make sure to season generously on all sides. Evenly distributed seasoning ensures every bite is delicious.
Cooking Your Chicken Breast in the Ninja Air Fryer
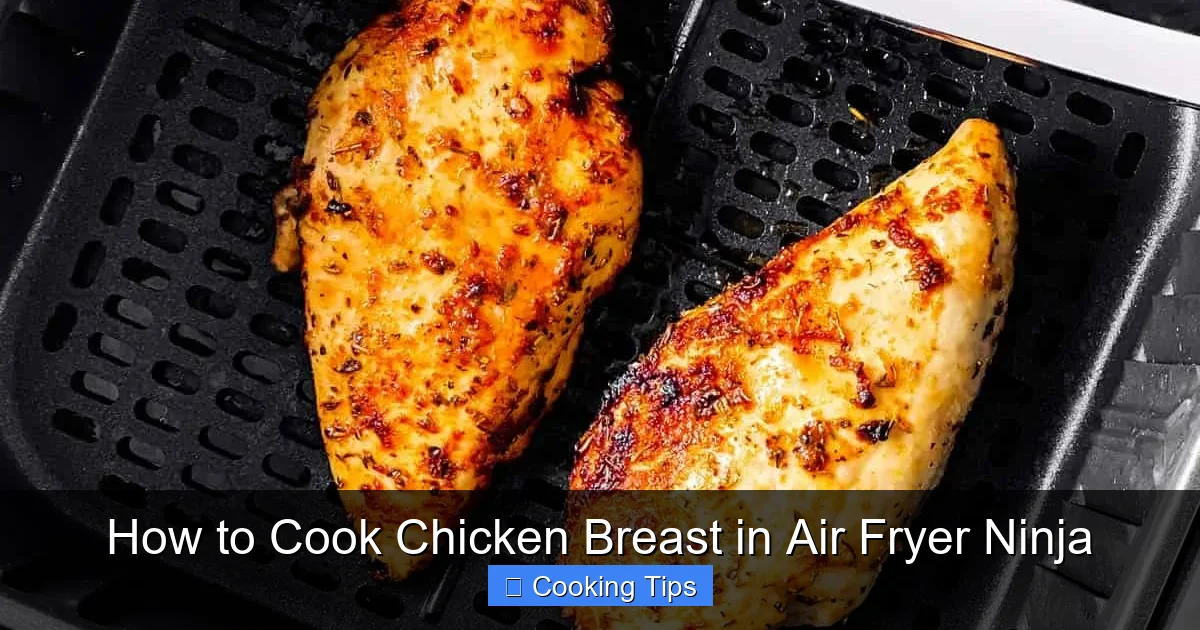
Visual guide about How to Cook Chicken Breast in Air Fryer Ninja
Image source: iheartumami.com
Now for the main event! Follow these steps for perfectly cooked chicken breast in your Ninja air fryer.
Step 1: Preheat Your Ninja Air Fryer
Just like with an oven, preheating your air fryer is essential for even cooking and optimal texture. Most Ninja air fryer models have a preheat function.
* How to Preheat: Select the “Air Fry” function, set the temperature to 380°F (190°C), and let it run for about 3-5 minutes. This ensures the air fryer is at the correct temperature before you add the chicken, preventing it from steaming instead of crisping.
Step 2: Arrange Chicken in the Basket
Place your seasoned chicken breasts in a single layer in the air fryer basket. It’s crucial not to overcrowd the basket. Overcrowding prevents proper air circulation, leading to uneven cooking and a lack of crispiness. If you have more chicken than can fit in a single layer, it’s better to cook in batches. For larger batches, consider cooking bone-in options, like how to cook bone-in chicken breast in air fryer, which might require adjustments.
Step 3: Set the Temperature and Time
The ideal temperature for cooking chicken breast in an air fryer is generally 380°F (190°C). The cooking time will vary depending on the thickness of the chicken breasts.
* For average-sized chicken breasts (about 6-8 ounces each): Start with 18-20 minutes.
* For thinner chicken breasts: You might need 15-17 minutes.
* For thicker chicken breasts: You may need 22-25 minutes.
Always refer to your Ninja air fryer’s manual for specific recommendations, as models can vary.
Step 4: Flip the Chicken Halfway Through
To ensure even browning and cooking on both sides, it’s important to flip the chicken breasts halfway through the cooking time.
* How to Flip: After about 9-10 minutes for average breasts, carefully open the air fryer basket, use tongs to flip each chicken breast, and then close the basket. This simple step makes a huge difference in the final outcome.
Step 5: Check for Doneness
The most important part of cooking chicken is ensuring it’s cooked through to a safe internal temperature. The USDA recommends an internal temperature of 165°F (74°C) for chicken.
* Using a Meat Thermometer: The best way to check for doneness is with an instant-read meat thermometer. Insert the thermometer into the thickest part of the chicken breast, avoiding the bone if any. The temperature should read 165°F (74°C).
* Visual Check: If you don’t have a thermometer, the chicken should be opaque white throughout with no pink. The juices should run clear when you pierce the thickest part with a knife or fork.
If the chicken is not yet cooked, return it to the air fryer for an additional 2-5 minutes at a time, checking frequently, until it reaches the correct internal temperature.
Step 6: Rest Your Chicken
Once cooked, remove the chicken breasts from the air fryer basket and let them rest on a clean plate or cutting board for about 5-10 minutes before slicing or serving. This resting period allows the juices to redistribute throughout the meat, ensuring it remains moist and tender. If you cut into it too soon, all the delicious juices will run out, leaving you with dry chicken.
Tips for Perfect Ninja Air Fried Chicken Breast
Visual guide about How to Cook Chicken Breast in Air Fryer Ninja
Image source: savorynothings.com
Here are some extra tips to elevate your air-fried chicken breast game:
* Don’t Overcook: This is the most common mistake. Chicken breast is lean and can dry out quickly. Always use a meat thermometer to be sure.
* Experiment with Seasonings: Don’t be afraid to try different spice rubs, herbs, and marinades. Think about what you’ll be serving the chicken with and season accordingly. For example, if you’re making it for tacos, use Mexican-inspired spices.
* Consider Pounding Thicker Breasts: If you have very thick chicken breasts, pounding them to an even thickness of about ¾ inch will ensure they cook through at the same rate. This is a great technique when making something like how to cook boneless chicken wings in air fryer, where even cooking is key.
* Clean Your Air Fryer Regularly: A clean air fryer works more efficiently. After each use, wipe down the basket and drawer. For a deeper clean, refer to your Ninja manual.
* Adjust for Your Model: While these guidelines are general, different Ninja air fryer models may have slight variations in cooking times or temperatures. It’s always a good idea to consult your specific model’s manual. For example, if you’re interested in how to operate your Ninja air fryer more generally, check out how to operate Ninja air fryer.
Troubleshooting Common Air Fryer Chicken Breast Problems
Even with the best instructions, you might run into a few issues. Here’s how to fix them:
Problem: Chicken is Dry
* Cause: Overcooked, lack of resting time, or insufficient fat/moisture.
* Solution: Use a meat thermometer and remove chicken as soon as it reaches 165°F (74°C). Always rest the chicken for 5-10 minutes. Consider brining or marinating for extra moisture.
Problem: Chicken is Undercooked in the Middle
* Cause: Basket was overcrowded, temperature too low, or cooking time too short.
* Solution: Ensure chicken is in a single layer with space between pieces. Increase cooking time by a few minutes. Make sure the chicken breast is fully thawed.
Problem: Exterior is Burnt, Interior is Raw
* Cause: Temperature too high for too long, or seasoning burned.
* Solution: Lower the temperature slightly and potentially reduce the cooking time. Ensure seasonings with sugar aren’t getting too much direct heat.
Problem: Uneven Cooking
* Cause: Inconsistent thickness of chicken breasts, overcrowded basket, or not flipping.
* Solution: Pound chicken breasts to an even thickness. Cook in batches if necessary. Always flip halfway through.
Serving Your Perfectly Cooked Chicken Breast
The beauty of air-fried chicken breast is its versatility. Once it’s cooked and rested, you can:
* Slice it: For salads, wraps, sandwiches, or as a lean protein on its own.
* Dice it: For quesadillas, pasta dishes, or as a topping for grain bowls.
* Shred it: For pulled chicken recipes.
It pairs wonderfully with roasted vegetables, rice, quinoa, or a fresh salad. It’s a fantastic component for meal prep, allowing you to have healthy protein ready for multiple meals throughout the week. For other meal prep ideas, you might find our guide on how to cook a roast in the air fryer useful for preparing larger cuts of meat.
Conclusion
Cooking chicken breast in your Ninja air fryer is an incredibly simple, fast, and rewarding way to prepare a healthy and delicious meal. By following these steps – from proper preparation and seasoning to precise cooking times and resting – you’ll consistently achieve moist, tender, and flavorful chicken breast. Say goodbye to dry, disappointing chicken and hello to perfectly air-fried perfection. Enjoy experimenting with different flavors and making this a staple in your cooking repertoire!