
An air fryer buffalo chicken sandwich recipe gives you crispy, saucy, restaurant-quality results in under 30 minutes with a fraction of the oil. It's one of those weeknight dinners that feels like a treat but comes together with basic pantry staples and a single appliance. If you've been defaulting to frozen nuggets or drive-through wings, this is the upgrade you didn't know you needed.
The air fryer circulates superheated air at high speed, which means the panko coating goes golden and crunchy without submerging the chicken in oil. You're looking at roughly 450 to 600 calories per sandwich depending on your bun and sauce amount, compared to 800-plus for most fast-food versions. Let's walk through exactly how to nail this recipe the first time.
Image source: Wikimedia Commons / Paul Goyette (CC BY-SA)
Quick Answer
An air fryer buffalo chicken sandwich uses breaded chicken breast cooked at 380°F for 12 to 14 minutes. The chicken is tossed in buffalo sauce made from melted butter and Frank's RedHot, then assembled on a brioche bun with ranch or blue cheese dressing. The result is a crispy, spicy sandwich with significantly less oil than deep frying.
Why Air Fryer Buffalo Chicken Sandwiches Are Worth Making at Home
A buffalo chicken sandwich from a sports bar or fast-casual chain runs 12 to 16 dollars, and you have zero control over oil quality or sauce ratio. Making it at home costs roughly 3 to 4 dollars per sandwich and takes less time than waiting for a delivery order.
The air fryer method also solves the biggest problem with homemade fried chicken: the mess. No vat of oil to dispose of, no splattered stovetop, no lingering fry smell. The basket goes in the dishwasher and you're done.
Here's what makes this recipe work so well in the air fryer specifically. The rapid air circulation triggers a Maillard reaction on the panko surface, which is the chemical browning process that creates a golden, crunchy texture. You get a result that's genuinely close to deep-fried without needing a quart of vegetable oil.
The recipe scales easily too. If you're feeding a crowd for game day, batch-cook the chicken and set up a sandwich assembly line. A 9-quart air fryer handles four chicken breasts in a single layer, enough for four full sandwiches.
For a closer look at larger models that handle big batches well, check out our guide to the best 9 qt air fryer for large batches.
What You Need: Ingredients and Equipment
You don't need anything fancy. Most of these ingredients are probably already in your kitchen.
For the chicken and breading:
- 2 boneless, skinless chicken breasts (6 to 8 oz each)
- 1 cup all-purpose flour
- 2 large eggs, beaten
- 1 1/2 cups panko breadcrumbs
- 1 teaspoon garlic powder
- 1 teaspoon paprika
- 1/2 teaspoon salt
- 1/2 teaspoon black pepper
- Cooking spray (avocado oil or olive oil)
For the buffalo sauce:
- 1/4 cup Frank's RedHot sauce
- 2 tablespoons unsalted butter, melted
For the sandwich assembly:
- 2 brioche buns
- Shredded lettuce
- Ranch or blue cheese dressing
- Optional: blue cheese crumbles, sliced pickles, tomato
Equipment:
- Air fryer (any standard basket-style model)
- Meat thermometer
- Three shallow bowls for the dredging station
- Tongs
Image source: Wikimedia Commons / Infrogmation of New Orleans (CC BY-SA)
Any standard air fryer handles this recipe. Basket-style models from brands like Instant Vortex, Ninja, or Cosori all work well. If you're wondering whether the Instant Vortex is a solid choice, our Is Instant Vortex Air Fryer Good breakdown covers its performance.
One thing worth noting: basket size matters here. You need enough surface area to lay the chicken breasts in a single layer without overlapping. Overlapping blocks airflow and creates soggy spots.
If your air fryer is on the smaller side, cook in two batches.
How to Make a Buffalo Chicken Sandwich in the Air Fryer (Step by Step)
This is the full process from raw chicken to finished sandwich. Total time is about 25 to 30 minutes including prep.
Step 1: Prep the Chicken
Place each chicken breast between two sheets of plastic wrap or parchment paper. Use a meat mallet or rolling pin to pound them to an even 3/4-inch thickness. This is the single most important prep step.
Uneven chicken means the thin parts overcook while the thick parts stay raw.
Pat the pounded chicken completely dry with paper towels. Moisture is the enemy of crispy breading.
Step 2: Set Up the Dredging Station
Get three shallow bowls ready in a row. Bowl 1 gets the flour mixed with garlic powder, paprika, salt, and pepper. Bowl 2 gets the beaten eggs.
Bowl 3 gets the panko breadcrumbs.
Seasoning the flour is where a lot of people go wrong. Plain flour tastes like paste. The garlic powder and paprika add a baseline flavor that carries through the whole sandwich.
Step 3: Coat the Chicken
Take one chicken breast and press it into the seasoned flour, coating both sides. Shake off the excess. Dip it into the egg wash, letting the extra drip off.
Then press it firmly into the panko, making sure every inch of the surface gets covered. Use your palms to press the crumbs into the meat.
Set the coated chicken on a plate or wire rack and repeat with the second breast. Let both pieces rest for 5 to 10 minutes before cooking. This rest period lets the coating set and adhere properly.
Skip it and the breading is more likely to peel off in the air fryer.
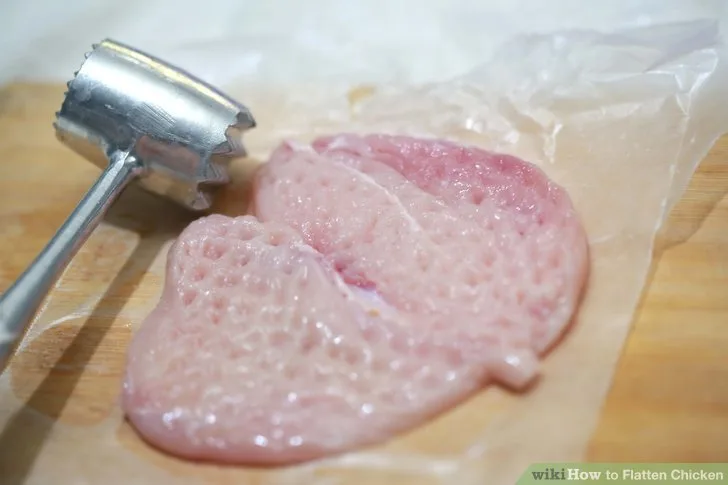
Image source: Bing (Web (fair-use with source credit))
Step 4: Preheat and Load the Air Fryer
Preheat your air fryer to 380°F for about 3 minutes. While it's heating, lightly spray the basket with cooking spray.
Place the coated chicken breasts in the basket in a single layer. Do not let them touch or overlap. Give each piece at least an inch of space on all sides.
Lightly spray the tops with cooking spray. This is what gives the panko that golden color. Without it, the coating comes out pale and dry.
Step 5: Cook
Air fry at 380°F for 6 to 8 minutes. Flip each piece using tongs (not a fork, which tears the coating). Cook for another 6 to 8 minutes on the second side.
Total cook time depends on thickness. A properly pounded 3/4-inch breast usually takes 12 to 14 minutes total. Thicker pieces may need up to 16 minutes.
Step 6: Check the Temperature
Insert a meat thermometer into the thickest part of the chicken. The internal temperature must reach 165°F, which is the USDA Food Safety and Inspection Service standard for safe poultry. If it's not there yet, cook in 2-minute increments until it hits the target.
Step 7: Toss in Buffalo Sauce
While the chicken rests for a couple of minutes after cooking, mix the melted butter and Frank's RedHot in a bowl. Toss each chicken breast in the sauce until evenly coated. Use enough sauce to cover the surface but not so much that the breading gets waterlogged.
Step 8: Assemble the Sandwich
Toast the brioche buns in the air fryer at 350°F for 1 to 2 minutes if you want a warm, slightly crispy base. Layer the bottom bun with lettuce, place the sauced chicken on top, drizzle with ranch or blue cheese dressing, and add any extra toppings. Cap it with the top bun.
Getting the Coating Right: Breading Tips That Actually Work
The breading is where most air fryer chicken sandwiches succeed or fail. Here's what separates a crispy, golden coating from a sad, patchy one.
Press the panko on firmly. This is the number one tip. After dipping the chicken in egg, place it in the panko and use your palm to press the crumbs into the meat. Flip and press again.
You want a thick, even layer physically stuck to the surface.
Let the coated chicken rest before cooking. Five to 10 minutes on a wire rack gives the egg time to set and bond the crumbs. If you toss it straight into the air fryer, the coating is more likely to blow off from the fan force.
Don't skip the oil spray. The air fryer's circulating air browns the surface, but it needs a thin film of fat to conduct heat into the panko. A light mist of cooking spray on both sides makes a dramatic difference in color and crunch.
Use panko, not regular breadcrumbs. Panko is made from crustless bread and has a flakier, airier structure. It crisps up significantly better than fine breadcrumbs in the air fryer's dry heat. Regular breadcrumbs tend to go hard and gritty instead of light and crunchy.
Season every layer. The flour gets seasoned, but you can also add a pinch of cayenne or onion powder to the panko for extra depth.
Image source: Bing (Web (fair-use with source credit))
One common mistake is using too much egg. If the chicken is dripping wet when it goes into the panko, you get a thick, gummy layer instead of a crispy one. Let the excess egg drip off for a few seconds before transferring to the breadcrumbs.
For extra crunch, try a double dredge. After the first round of flour, egg, and panko, dip the chicken back into the egg and then into panko a second time. You get a thicker, shatteringly crispy crust.
It adds a few minutes to prep but the texture is noticeably better.
The Best Buffalo Sauce Ratio and How to Toss It
Authentic buffalo sauce is dead simple: hot sauce and butter. The classic ratio from the Anchor Bar in Buffalo, New York, where the style originated in 1964, is roughly equal parts melted butter and Frank's RedHot cayenne pepper sauce.
For two chicken breasts, mix 1/4 cup Frank's RedHot with 2 tablespoons of melted butter. That's enough to coat both pieces generously without drowning them. For spicier results, shift the ratio to 60 percent hot sauce and 40 percent butter.
For milder, go the other direction.
When you toss the chicken matters. Sauce the chicken immediately after it comes out of the air fryer while it's still hot. The heat helps the sauce cling. If you wait too long and the chicken cools, the butter solidifies and you get an uneven, waxy coating.
Don't sauce before cooking. If you toss raw or breaded chicken in buffalo sauce before air frying, the sugar in the hot sauce burns and the breading turns black and bitter. Always sauce after the chicken is fully cooked.
Some people add a splash of white vinegar or a pinch of garlic powder for extra tang and depth. A teaspoon of honey can balance the heat if you're cooking for people who don't love intense spice.
Image source: Wikimedia Commons / Missvain (CC BY)
If you're meal prepping, keep the sauce separate from the cooked chicken. Store the air-fried chicken in one container and the sauce in another. Toss together right before assembling.
This keeps the breading crispy for up to 3 days in the refrigerator.
Air Fryer Settings: Temperature, Timing, and When to Flip

Image source: Bing (Web (fair-use with source credit))
380°F is the sweet spot for breaded chicken in the air fryer. It's hot enough to crisp the panko without burning the coating before the inside cooks through. Some recipes call for 400°F, but that tends to brown the outside too fast, leaving the center undercooked.
At 380°F, a pounded 3/4-inch chicken breast takes 12 to 14 minutes total. Flip once at the halfway mark, around minute 6 or 7. Use tongs and be gentle.
The coating is most fragile during the first half of cooking. Once the panko sets and turns golden, it's much more stable.
Don't skip the preheat. A preheated basket gives the coating an immediate sear. Starting in a cold basket means the panko sits and steams for the first few minutes, which gives you a soft, pale crust.
Here's a quick reference for different chicken thicknesses:
| Thickness | Temperature | Total Time | Flip At |
|---|---|---|---|
| 1/2 inch | 380°F | 10 to 12 min | 5 min |
| 3/4 inch | 380°F | 12 to 14 min | 6 to 7 min |
| 1 inch | 375°F | 15 to 18 min | 8 min |
Thicker pieces need a slightly lower temperature to cook through without burning the coating. If you're working with a full-thickness breast that you didn't pound, go down to 375°F and add a few minutes.
How to Tell the Chicken Is Done Without Guessing
The only reliable way to check doneness is a meat thermometer. Insert it into the thickest part of the breast at an angle. You're looking for 165°F, which is the USDA Food Safety and Inspection Service minimum safe temperature for poultry.
Visual cues alone aren't trustworthy. The panko will be golden brown well before the inside hits 165°F. Cutting into the chicken to check is a bad idea too.
You lose juices and the breading tears off at the cut site.
If you don't have a thermometer, press the center of the chicken with tongs. Fully cooked chicken feels firm and springs back. Undercooked chicken feels soft and squishy.
This method works in a pinch but it's not precise. A basic instant-read thermometer costs about 10 dollars and eliminates the guesswork.
Image source: Wikimedia Commons / andrusdevelopment (CC BY)
Let the chicken rest for 2 to 3 minutes after it comes out of the air fryer. The internal temperature will carry over by about 5 degrees. Resting also lets the breading firm up so it doesn't slide off when you toss it in buffalo sauce.
Common Mistakes That Ruin Air Fryer Buffalo Chicken
Most failures come down to a handful of repeatable errors. Here's what goes wrong and how to fix it.
Overcrowding the basket. This is the number one mistake. When chicken pieces overlap or touch, air can't circulate between them. The result is uneven cooking and soggy spots.
Always cook in a single layer with space between pieces.
Skipping the oil spray. The air fryer uses hot air, not oil, to cook. But the food itself still needs a thin layer of fat to brown. Without cooking spray on the panko, you get a pale, cardboard-tasting coating.
Saucing the chicken before cooking. Buffalo sauce contains sugar. Sugar burns at air fryer temperatures. If you toss breaded chicken in buffalo sauce before it goes in the basket, the coating turns black and bitter.
Always sauce after cooking.
Not pounding the chicken to even thickness. A raw chicken breast is thick at one end and thin at the other. The thin end dries out before the thick end is done. Pounding to an even 3/4-inch solves this.
Moving the chicken too early. When you flip before the first side has set, the coating sticks to the basket and tears off. Give it at least 6 minutes on the first side before touching it.
Using the wrong breading texture. Fine breadcrumbs or flour alone won't give you the crunch you want. Panko's flaky structure creates air pockets that crisp up in the air fryer's dry heat. Stick with panko.
Air Fryer vs. Deep Fryer vs. Oven: Which Method Wins?
Each method produces a noticeably different result. Here's how they stack up.
Air fryer gives you a crispy, golden coating with about 80 percent less oil than deep frying. Cook time is 12 to 14 minutes. Cleanup takes about 2 minutes.
The texture is lighter than deep-fried, with a dry crunch rather than a heavy, greasy one. It's the best balance of speed, health, and convenience for a weeknight.
Deep fryer produces the crunchiest, most indulgent result. The chicken cooks in 3 to 5 minutes at 350°F and the coating goes shatteringly crisp. But you need a quart of oil, the cleanup is a pain, and the calorie count jumps.
This is the method for when you want the real deal and don't mind the mess.
Oven baking is the most hands-off but the slowest. At 425°F, breaded chicken takes 22 to 28 minutes on a wire rack over a sheet pan. The coating gets crispy but never quite as crunchy as air frying.
It's a solid option for large crowds since you can fit more chicken on sheet pans.
| Factor | Air Fryer | Deep Fryer | Oven |
|---|---|---|---|
| Cook time | 12 to 14 min | 3 to 5 min | 22 to 28 min |
| Oil needed | Light spray | 1 quart+ | Light spray |
| Cleanup | Easy | Difficult | Moderate |
| Crispiness | High | Highest | Medium |
| Best for | Weeknights | Special occasions | Large batches |
For most people making buffalo chicken sandwiches at home, the air fryer is the clear winner. It's fast, cleanup is minimal, and the result is close enough to deep-fried that most people can't tell the difference once the sauce goes on.
If you're cooking for a big family or game day crowd, a larger air fryer makes a real difference. Our roundup of the best 8 qt air fryer for roasting chicken covers models that handle bigger batches without sacrificing crispiness.
Easy Variations: Spicy, Keto, and Extra-Crispy Versions
Once you've got the base recipe down, it's easy to tweak it for different preferences or dietary needs.
Extra-spicy version: Add 1/2 teaspoon of cayenne pepper to the seasoned flour and use a full 1/2 cup of Frank's RedHot in the sauce with only 1 tablespoon of butter. A few dashes of habanero hot sauce in the buffalo mix adds serious heat. Toss the chicken while it's still piping hot so the spice penetrates the coating.
Keto version: Skip the flour and panko. Coat the chicken in a mixture of grated Parmesan cheese and crushed pork rinds. Use the same egg wash step but press the pork rind mixture into the chicken.
Air fry at 380°F for 12 to 14 minutes. Serve on a lettuce wrap or keto-friendly bun.
Extra-crispy version: Do a double dredge. After the first coating of flour, egg, and panko, dip the chicken back into the egg and then into panko a second time. Press firmly.
Let it rest for 10 minutes. Add an extra minute or two of cook time since the coating is thicker.
Chicken tender version: Swap the breast for chicken tenders. They cook faster, about 8 to 10 minutes at 380°F, and fit the bun without hanging over the edges. Great for kids or appetizer-sized sliders.
Blue cheese crumble upgrade: Add a handful of actual blue cheese crumbles on top of the sauced chicken before closing the bun. The crumbles melt slightly from the residual heat and add a sharp, tangy bite that cuts through the richness.
For more air fryer recipes that work well for weeknight dinners, check out our air fryer BBQ chicken legs recipe and our air fryer bratwurst recipes. Both use similar techniques and pair well with bold sauces.
Meal Prep and Storage Tips
Cook the breaded chicken and store it unsauced. That's the key to meal prep that doesn't turn into a soggy disappointment. The cooked chicken keeps in an airtight container in the refrigerator for up to 3 days.
Store the buffalo sauce separately.
When you're ready to eat, reheat the chicken in the air fryer at 370°F for 3 to 4 minutes. This brings back the crunch far better than a microwave. Then toss in the sauce and assemble.
You can freeze cooked, unsauced chicken for up to 2 months. Thaw overnight in the refrigerator and reheat at 370°F for 5 to 6 minutes. The texture won't be quite as crisp as fresh, but it's still solid.
For the sauce, a big batch keeps in the fridge for 2 weeks. Warm it briefly in the microwave before tossing with the chicken so the butter re-liquefies and coats evenly.
Serving Suggestions and Side Pairings
Celery and carrot sticks with ranch are the classic buffalo pairing. The cool, crisp vegetables balance the heat. Beyond that, a few sides round out the meal nicely.
Sweet potato fries are a great match. Air fry them at 400°F for 12 to 15 minutes with a light spray of oil and a pinch of salt. The sweetness plays well against the spicy buffalo sauce.
A simple side salad with mixed greens, cucumber, and a light vinaigrette also cuts through the richness. Coleslaw adds crunch and creaminess that complements the buffalo flavor without competing with it.
For game day spreads, set out a platter with the cooked buffalo chicken, a basket of toasted buns, and small bowls of ranch, blue cheese crumbles, lettuce, and pickles. Let people build their own sandwiches. It's a crowd-pleaser with almost no extra effort.
For more quick air fryer sides, our air fryer asparagus recipe with Parmesan cooks in under 10 minutes and pairs well with any main dish.
Frequently Asked Questions
Can I use frozen chicken breasts for this recipe?
Thaw them completely first and pat very dry. Frozen chicken releases moisture as it cooks, which steams the breading instead of letting it crisp. Thawing in the refrigerator overnight gives the best results.
What if I don't have an air fryer?
Use the oven method. Place breaded chicken on a wire rack over a sheet pan and bake at 425°F for 22 to 28 minutes, flipping halfway. The coating won't be quite as crunchy but the result is still good.
Can I make this recipe with chicken thighs instead of breasts?
Absolutely. Boneless, skinless thighs are more forgiving because they have more fat, so they stay juicy even if slightly overcooked. Increase the cook time by 2 to 3 minutes since thighs are often thicker.
How do I make the buffalo sauce less spicy?
Use a 2:1 ratio of butter to hot sauce instead of 1:1. You can also mix in a tablespoon of honey to mellow the heat. A splash of Worcestershire sauce adds depth without adding spice.
Is an air fryer actually healthier than deep frying?
Yes. Air frying uses up to 80 percent less oil, which significantly reduces calorie and fat content per serving. A 2015 study in the Journal of Food Science found air-fried foods had comparable texture to deep-fried versions with substantially lower fat absorption.
What size air fryer do I need for this recipe?
A 5-quart model handles two chicken breasts comfortably in a single layer. For four or more sandwiches at once, an 8-quart or 9-quart model is a better fit. Larger baskets mean fewer batches and less waiting.
Final Thoughts
The buffalo chicken sandwich is one of those recipes that sounds like it should be complicated, but the air fryer makes it genuinely simple. Twenty-five to 30 minutes, a handful of pantry staples, and you've got a sandwich that rivals anything from a sports bar.
The technique is forgiving once you nail the basics. Pound the chicken even, press the panko on firmly, don't overcrowd the basket, and sauce after cooking. Those four habits will get you crisp, juicy, properly spicy results every time.
Whether it's a weeknight dinner or a game day spread, this recipe delivers. And once you've got the base down, the variations are endless. Double the heat, swap the bun for lettuce, or go with tenders instead of breast.
The air fryer handles all of it without breaking a sweat.